The website is undergoing some changes, I’m working on fixing broken links and reworking some of the site structure. This will be an on going process as I have years of content to fix and convert.
Author: Centuries Sewing
-

Book Series Review: Historical Clothing From the Inside Out
Disclaimer: I was sent a free copy of these books for review purposes. However, all thoughts, opinions, and criticisms are my own.
The late 15th century is not my area of expertise even after making a few kirtles that I consider “in the style of”.
So when I was asked to review a new series of bookson the late 15th century I was very very eager. I love sinking my teeth into new research and learning techniques, especially for an era I have only passing knowledge in.The Books
The two books in this series (one for men and one for women) are slim volumes each coming in at only 48 pages each, but the pages are well used.
The introduction explains the scope of the handbook, its focus on Scandinavian source material with some allowances being made for northern German influence.
This made me very happy. There is often a strong temptation to cherry pick from several different sources across an era due to lack of extant garments or access to new information.The next few pages cover the historical context of the period which I will be reading more up on just from the short introduction. I had not run across the Kalmar Union before this and lost a few hours reading various Wikipedia articles.
There is a nice collection of images giving an overview of the general aesthetic of the era along with an explanation of the fashionable silhouette. The rest of this section also covers dyes, with a very nice natural dye color chart, fabrics, some hand sewing techniques, and where to use which type of stitch.
At this point the books diverge and we get into the contents of the wardrobe.
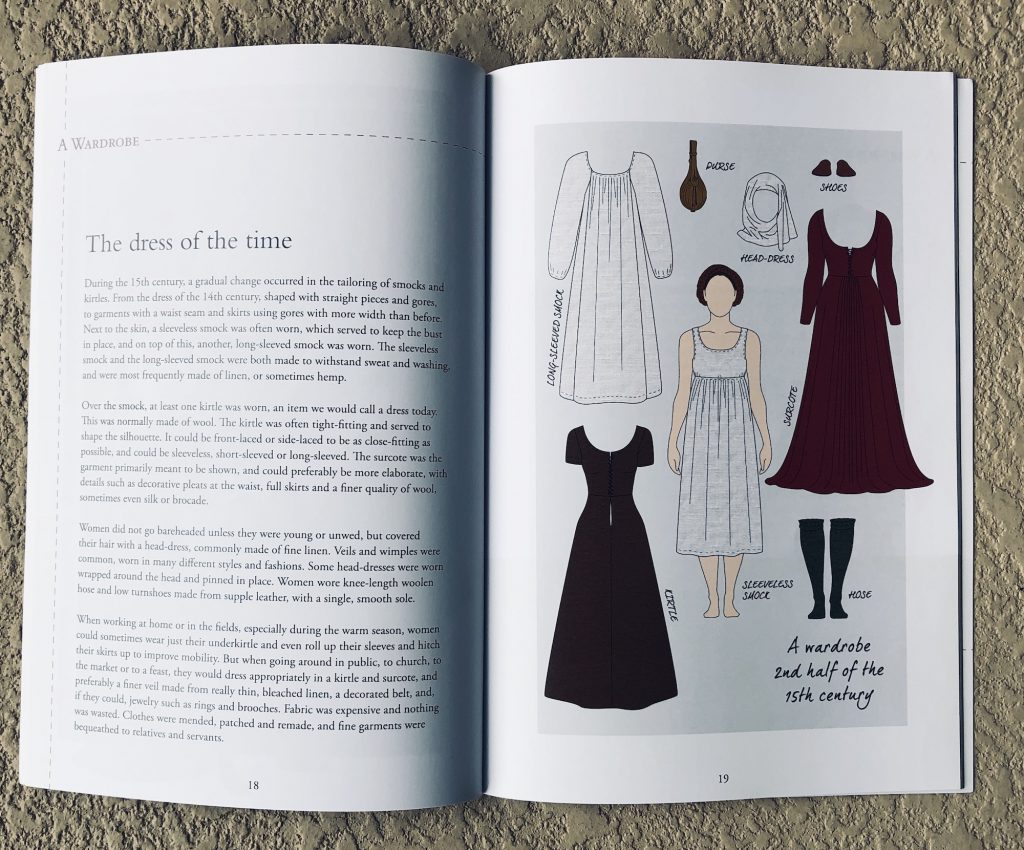
Women’s Clothing
This section covers smocks (including the sleeveless smock), kirtles, surcoats, hose, headdresses, shoes, hairstyles, and dress accessories.
Each layer of clothing is accompanied by clear illustrations and period images. The text addresses the fit, function and offers construction suggestions. There are also cropped images of the recreated clothing to highlight different details like lacing, sleeve gussets, and pinned on sleeves.One thing that is missing are any full body photos of the recreated garment being worn. I think being able to see the way a recreated garment falls compared to the manuscript would be a useful visual aid for anyone setting out to make a kirtle or gown.
There are no patterns in the book, only shaded diagrams to suggest the shape of the pattern pieces. This would be enough of a guide for someone already skilled in draping or flat patterning use as a base.
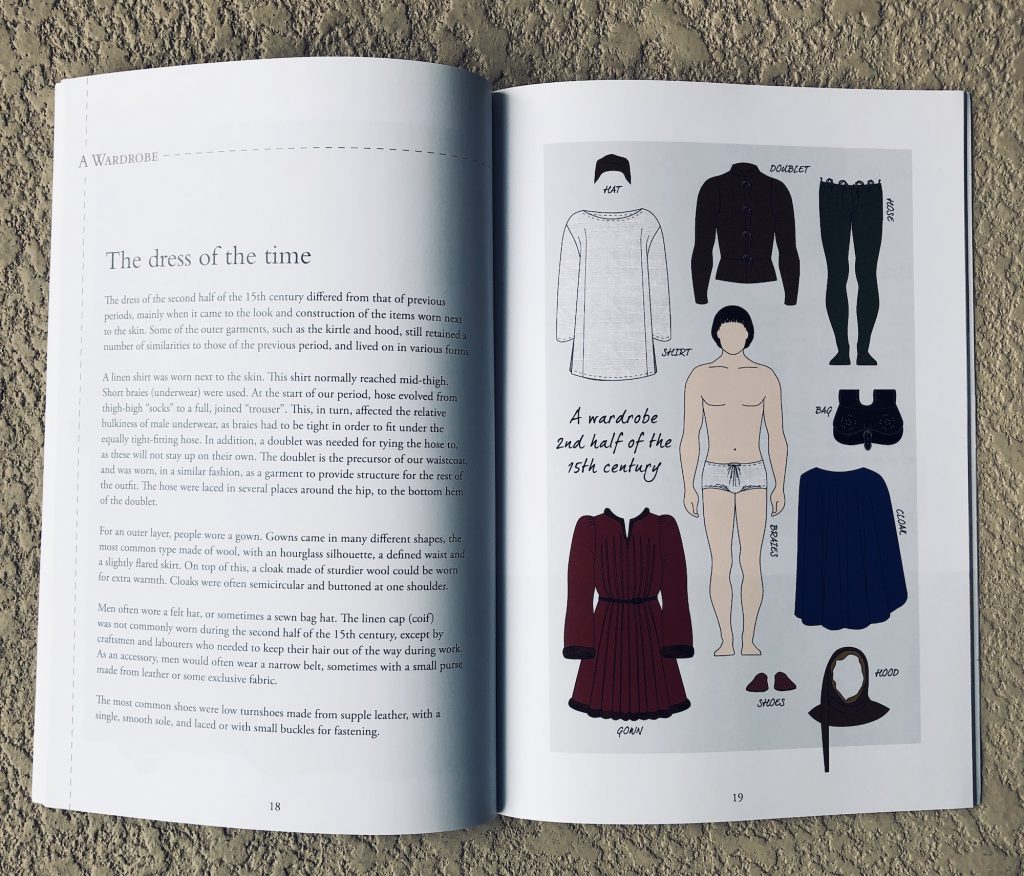
Men’s Clothing
The wardrobe in the men’s book starts out braies, noting that the fit of them plays an important role in the fit of the hose. From there we are on to shirts and doublet and hose. Men’s gowns shows the largest section of styles showing a few different necklines and pleating option depending on your materials and station.
Looking at the lush pleats I can’t help but wonder if this is the 15th century equivalent of throwing on a stylish coat that pulls your look together.From
gowns we move on to cloaks, hoodsand headware with instructions on how to wear your hood in the trendy chaperon style. Shoes, belts, and purses are covered, jewelry and one pageis devoted to men’s hairstyles.What I’d like to see more of
I’d like to see the hand sewing section expanded on just all little, the basic stitches are shown but there is no mention of how to sew eyelets or lacing rings.
While I approve of the tight scope of the book I think it could be expanded upon. If I was an absolute novice to historical dress this book would be useful, but I’d have no context for the styles. Why did men wear tight hose and doublet and then cover it up with large flowing gowns? What did they wear before that came into fashion?
I’d love to see more photographs of the recreated garments being worn, used, and how the wearers feel about them. Do pin on sleeves stay in place when cooking over a fire? Does wearing a veil change the way you walk? Does it make someone feel closed in?
The index includes a number of books and websites for further study but I do not see any mention of wills or inventories. I do not know if the habit of passing down clothing was being done yet as it was in the 16th century.
Are these Books for You?
I would recommend these books if you are a reenactor who is changing eras and needs a solid quick overview of the late 15th century. These books would also be useful to writers of historical fiction, filmmakers and others in creative fields that overlap with fashion history.
From a sewing perspective I would recommend these to a beginner only if they had a friend or mentor who knows how to pattern or drape. The handbooks are just that, handbooks of the era and do not go stitch by stitch into recreating the garments. Anyone looking to use these books to recreate a full wardrobe needs to have a solid understanding of how wools and linens behave, how to pattern them, and fit them to shape the body.
Where to Buy
On Amazon:
Historical Clothing From the Inside Out: Men’s Clothing of the Late 15th Century by Anna Malmborg (Author), Willhelm Schütz (Author)
Historical Clothing From the Inside Out: Women’s Clothing of the Late 15th Century by Anna Malmborg (Author), Wilhelm Schütz (Author)Through the publisher Chronocopia Publishing
-
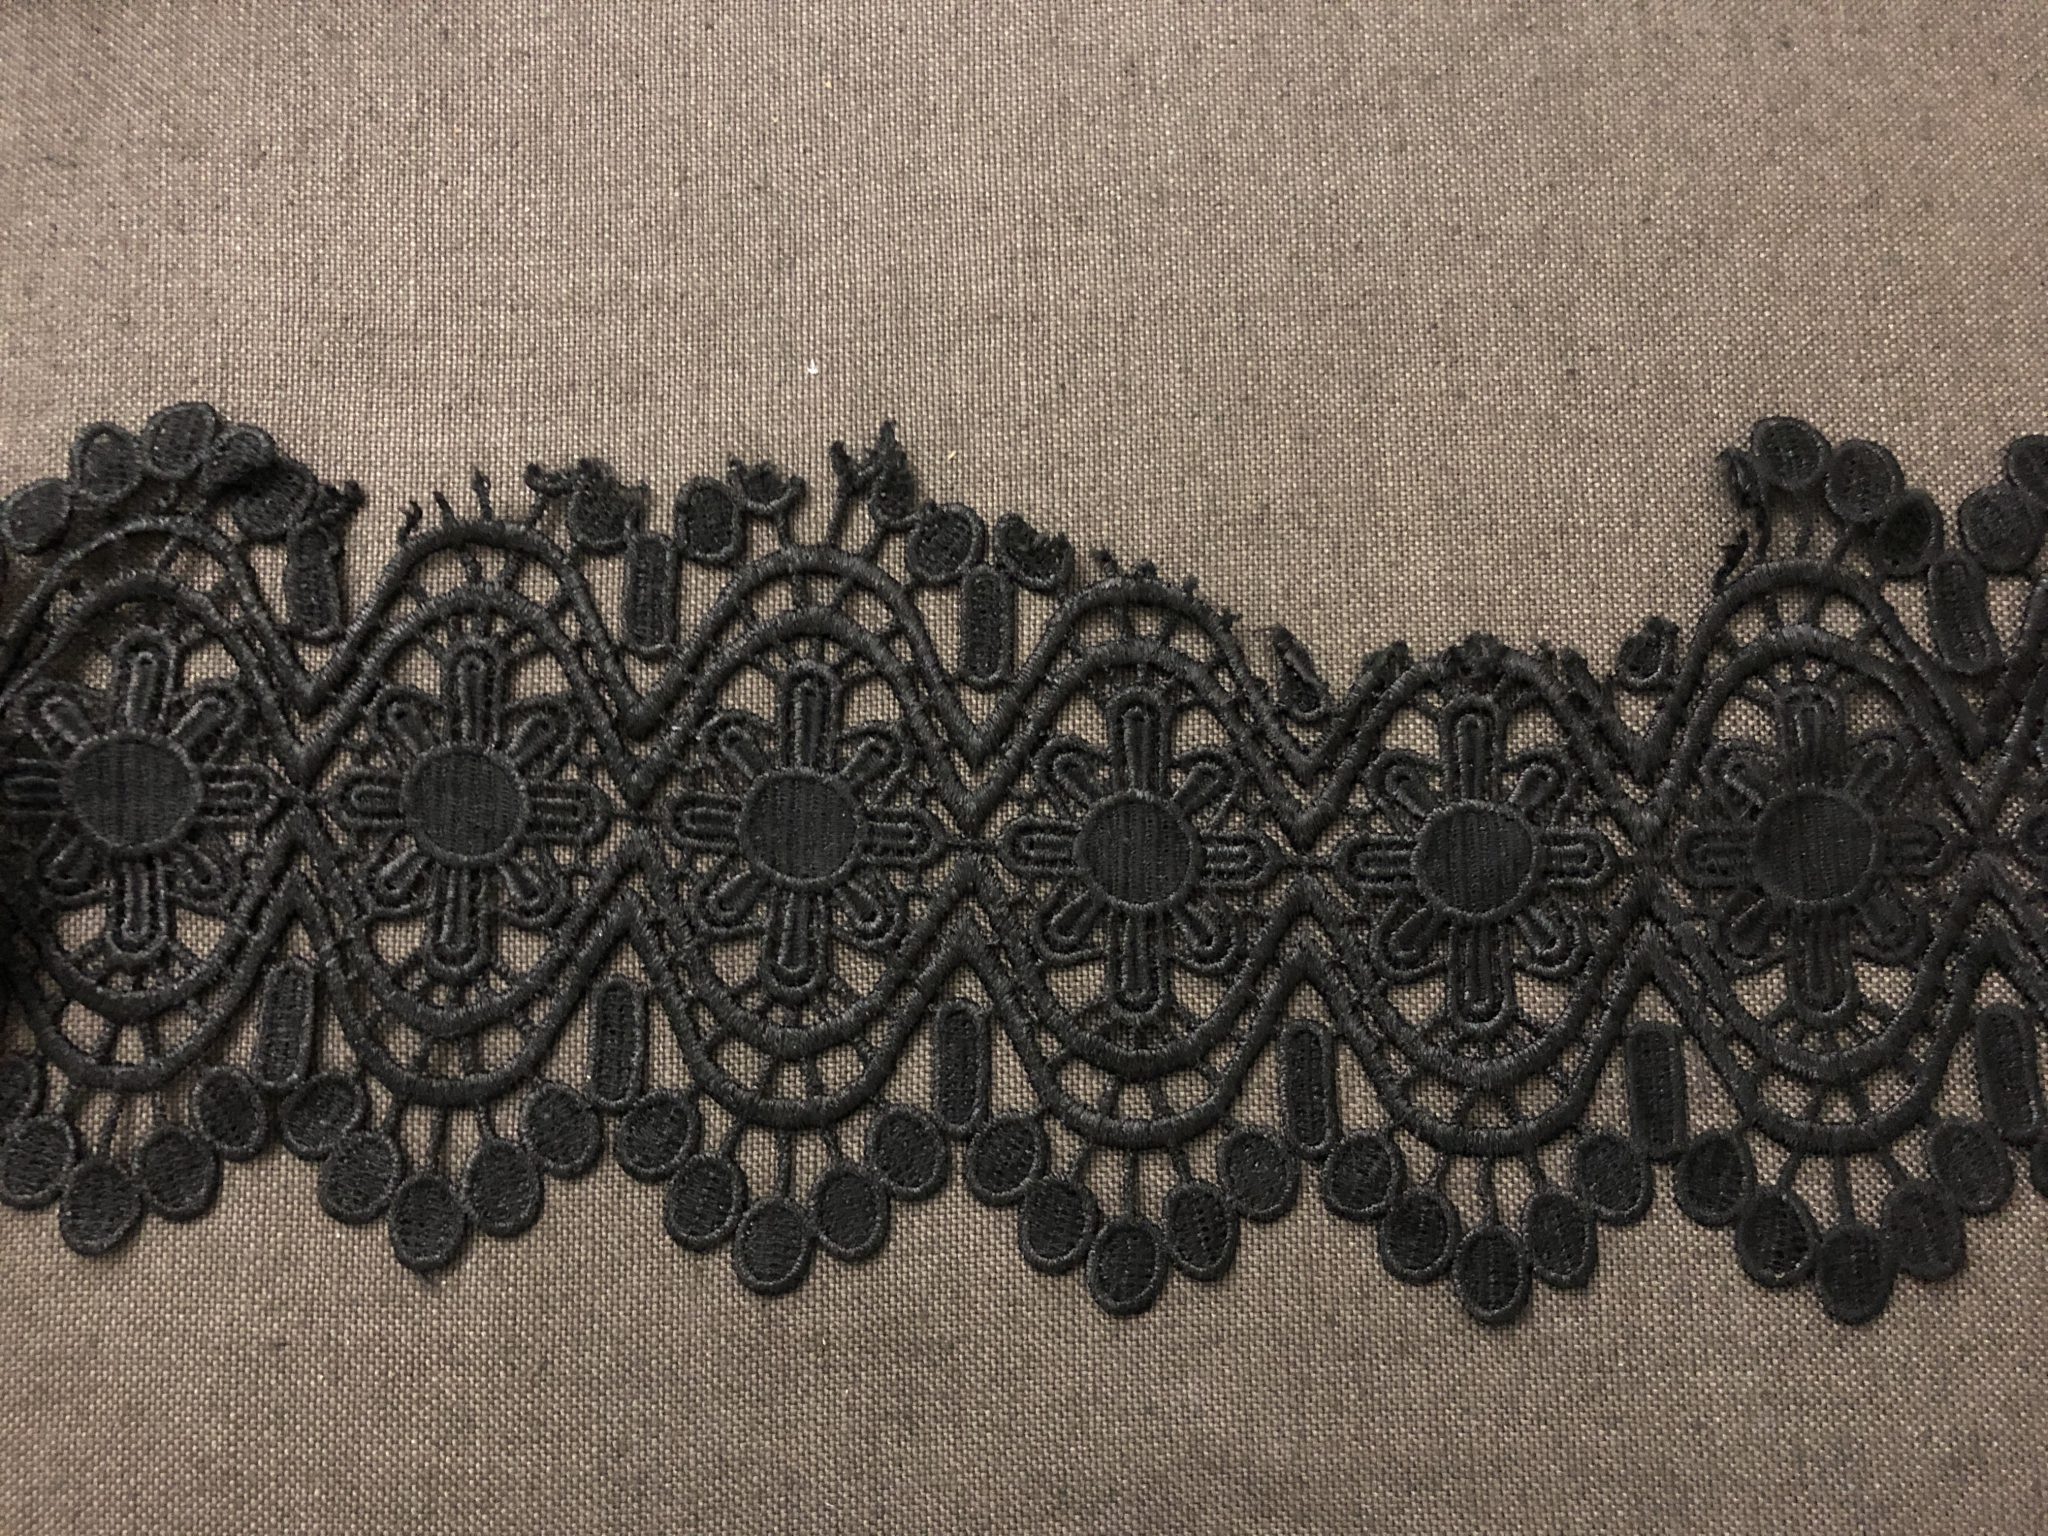
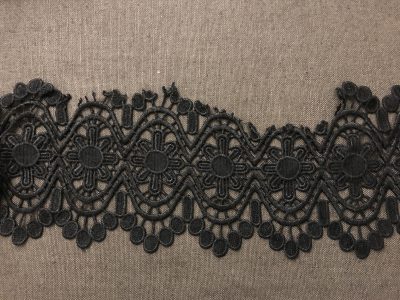
How to Repair Lace Trim
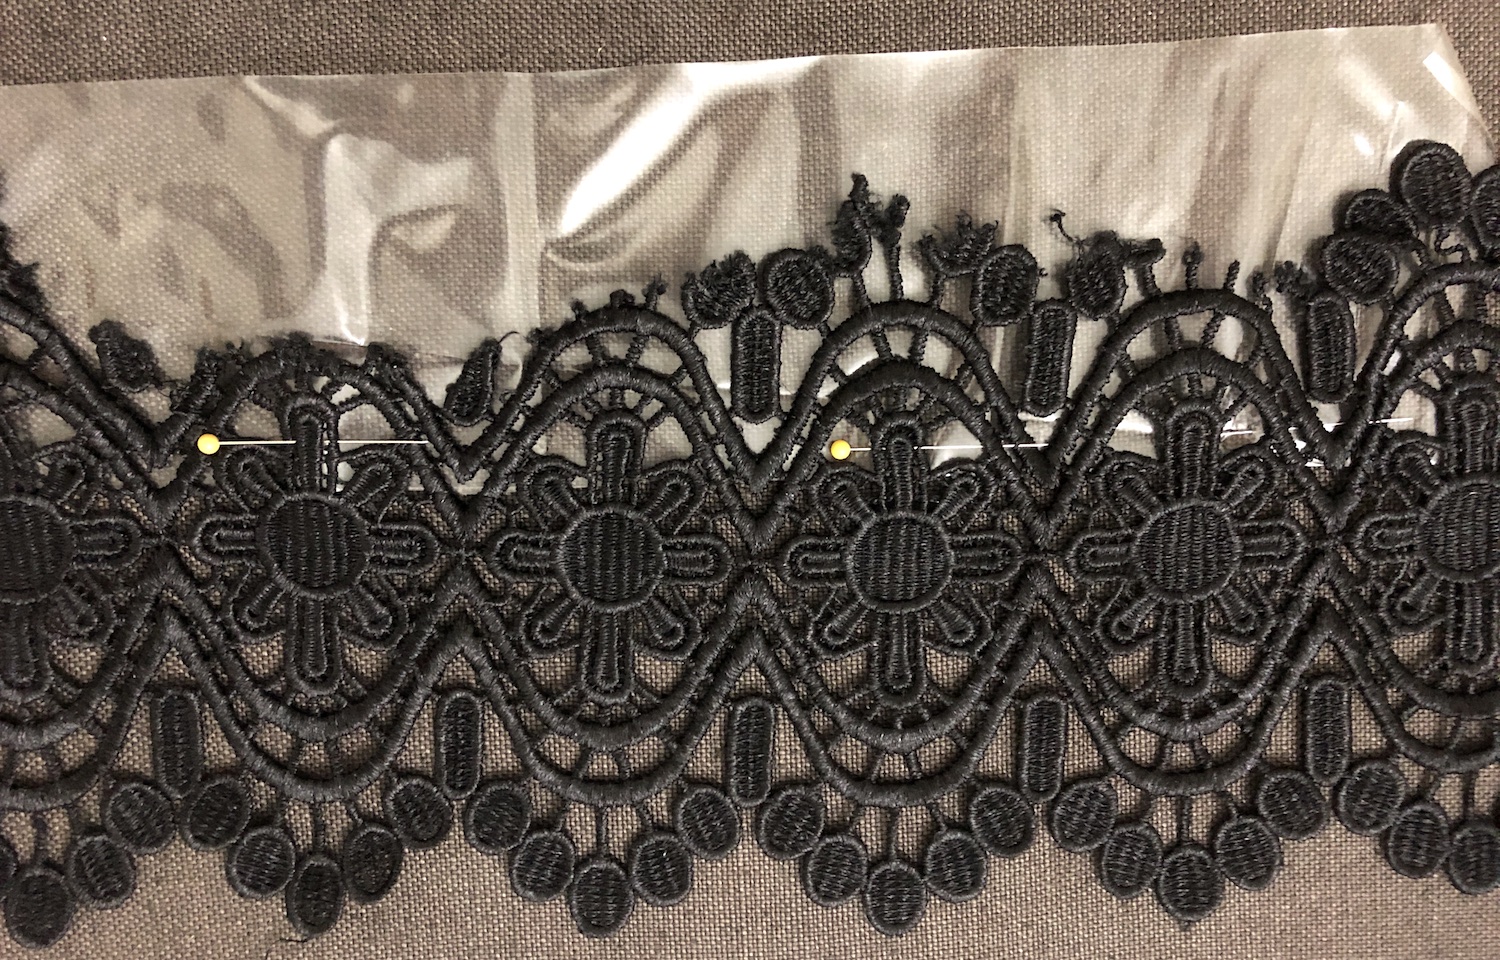
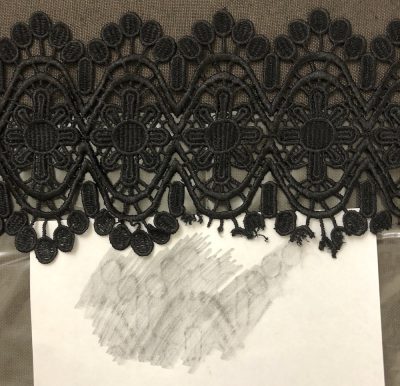
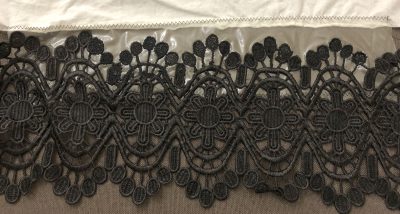
Three weeks ago I purchased 4 yards of a wide black lace on Etsy. When it arrived I was happy with it, but on further inspection, I noticed it was torn badly over several of the motifs. I messaged the seller but never heard back. Now, I need every inch of the trim to go around the hem of a gown, getting more trim isn’t in my budget. The one I purchased was the right price and the right width.
But I think I can rebuild it, with wash away stabilizer, some patience, and only a few broken needles.
Materials:
- Paper
- Pencil
- Thread
- Embroidery or Top Stitch Needles (depending on the size of your thread)
- Heavy Duty wash away stabilizer
- Metallic Sharpie or Pen you can see easily
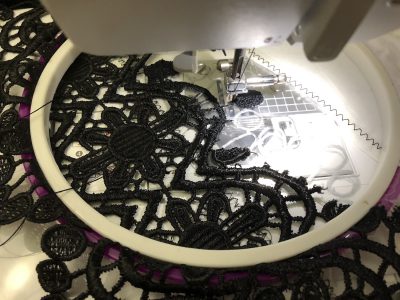
First I made a rubbing of the lace. Just like a grade school nature project I put the paper on the lace and rubbed away with the pencil until I had the pattern of the lace showing through.
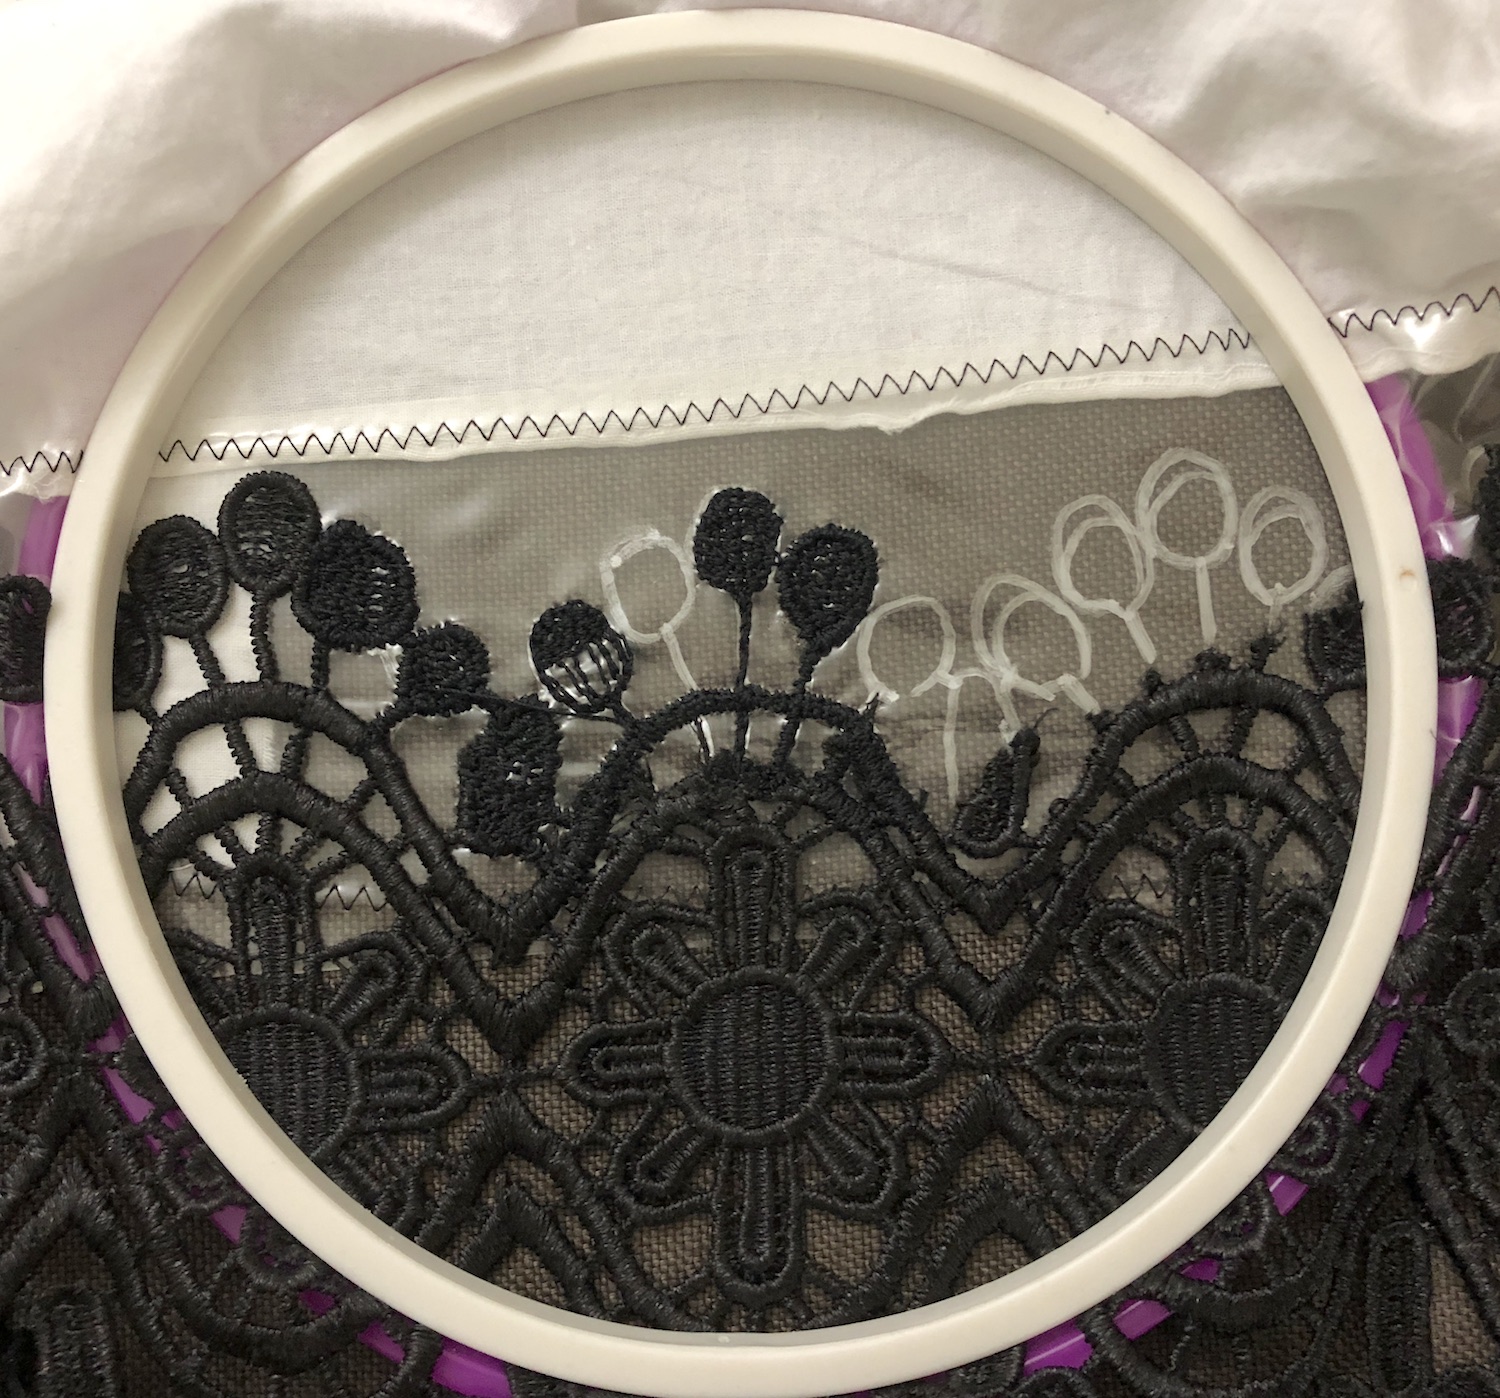
Next, I cut 3-inch strips of the wash away stabilizer and pinned them to the lace. This was zig-zag stitched to the lace on the machine, along with a strip of muslin to make sure nothing would slip around in the embroidery hoop.
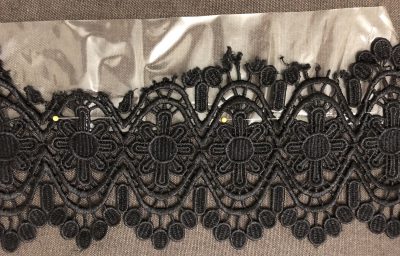
Then I positioned the lace rubbing under each motif, lining the design up. On top of the stabilizer, I used the silver sharpie to draw in the missing elements along the edge of the lace.
Now it was time to start rebuilding the lace. It took a few tries to find the right needle and thread combination.
I started out with a rayon thread in the spool and a fine polyester in the bobbin. The needle shredded the top thread, so I switched to a topstitching needle and silk buttonhole twist for the top thread and a cotton thread in the bobbin. The silk twist kept getting pulled down into the bobbin casing.
So finally I switched back to the rayon thread, kept the topstitch needle and the cotton thread in the bobbin and had no problem with it.
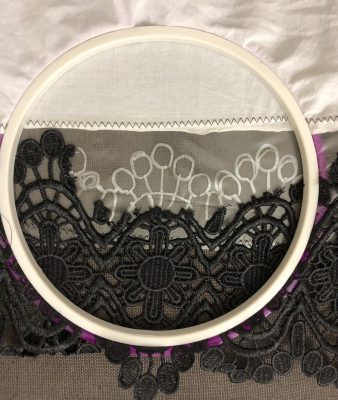
First, take a few stitches into the lace itself and then start your outline, going around at least 4 times.
I filled in each outline with a grid of threads going up and across several times to make a support lattice. Then I started filling in over the grid, keeping the stitches close until very little of the stabilizer can be seen.
Once each “bubble” was filled I sew around the outside of it with a narrow small zig-zag stitch. This neatened the edge and locked the other stitches in place.
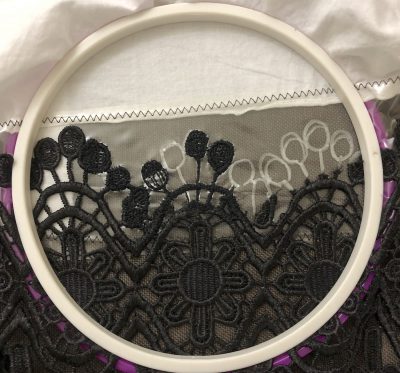
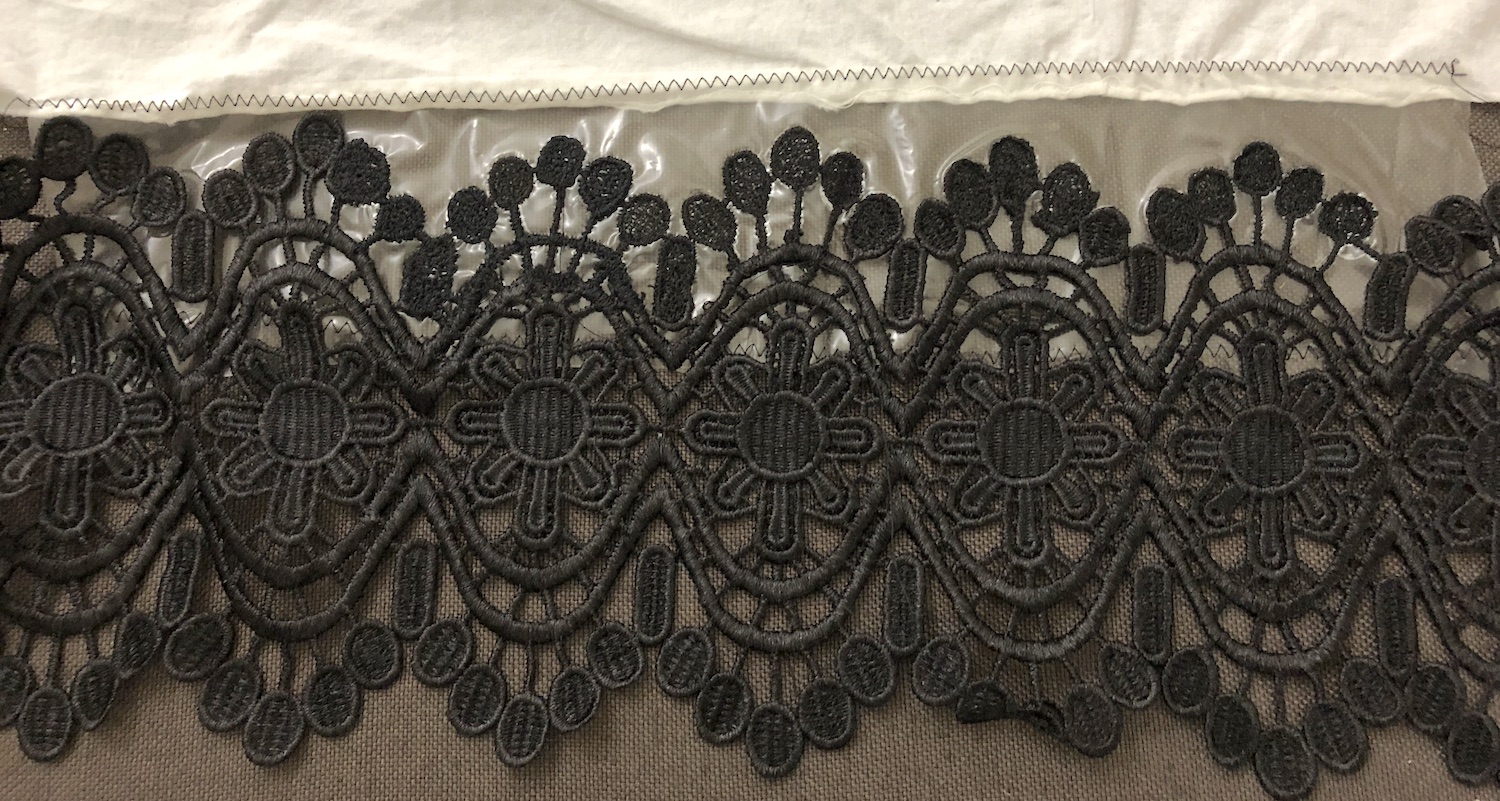
For the “stems” I ran three or four rows of stitching from the bubble to the lace, making sure to anchor it in place. I then went over the rows with the same zig-zag stitching. The process was the same for the rest of the lace, rebuilding or blending in new sections with existing ones and trimming off any parts that were too far gone.
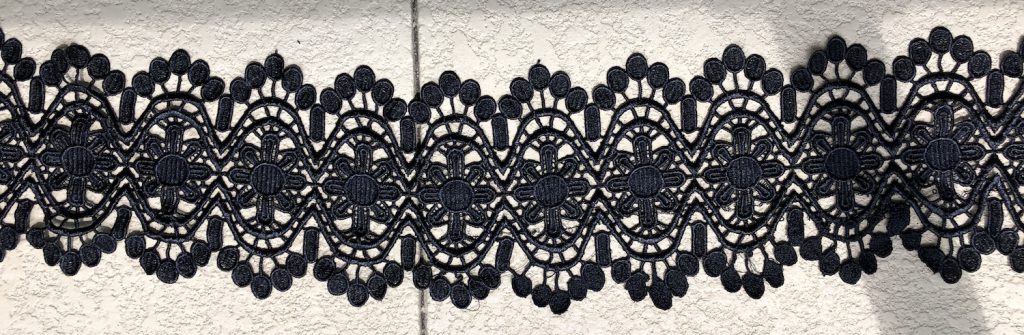
My final step was to make sure each bubble was connected to its neighbor, is did this with a few stitches in each one and the same zig-zag stitching. I worked on the lace over the course of three days an hour or two at a time, until all the lace was rebuilt and looked like this:
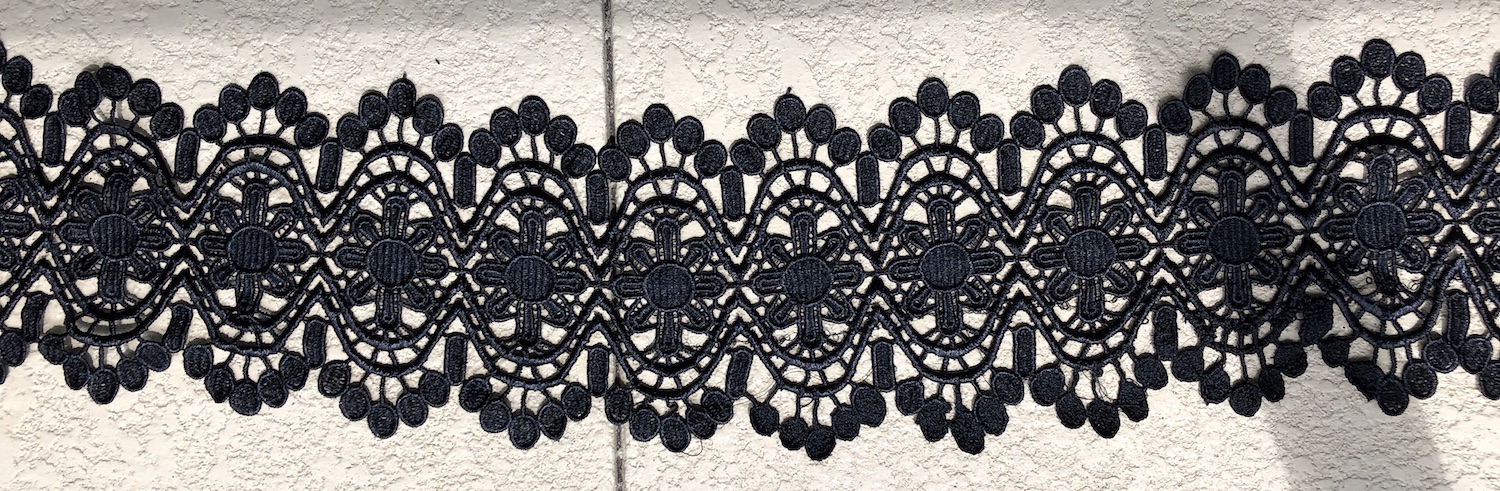
Then it was time to trim away the excess stabilizer and see if all that time and effort held up.
It did! Here is the final lace drying in the sunshine. Can you spot the repairs? A few bits are a little rough due to trying to blend the old lace with the new but from a foot away it will never show.
-
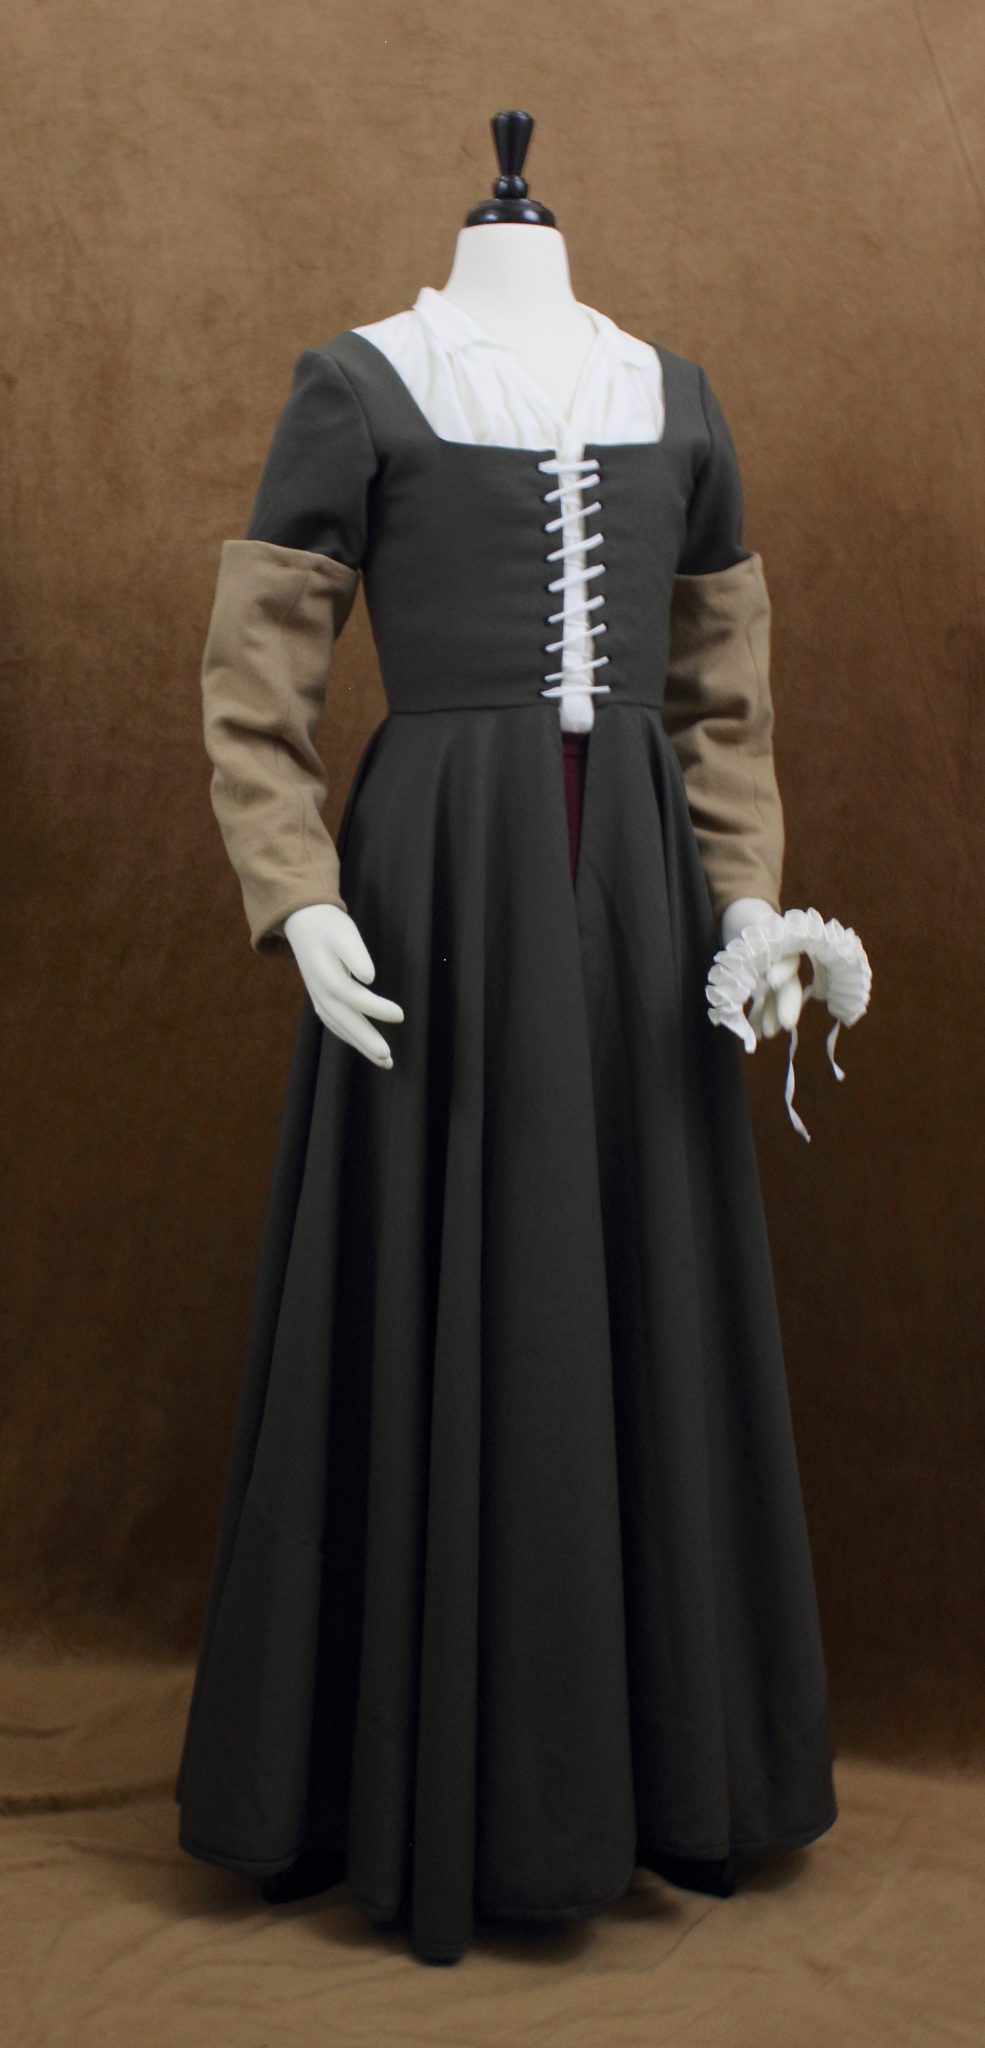
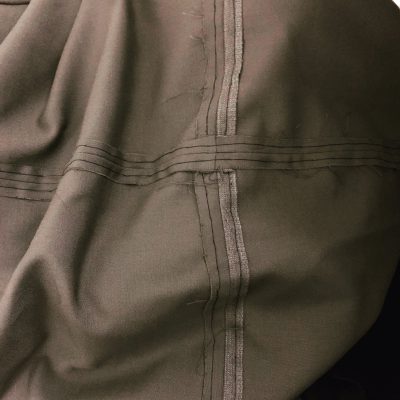
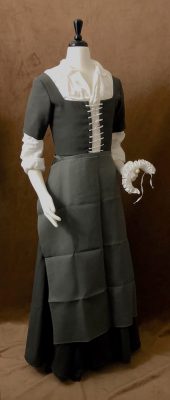
A 16th Century Kirtle in Olive Wool with Caramel Oversleeves
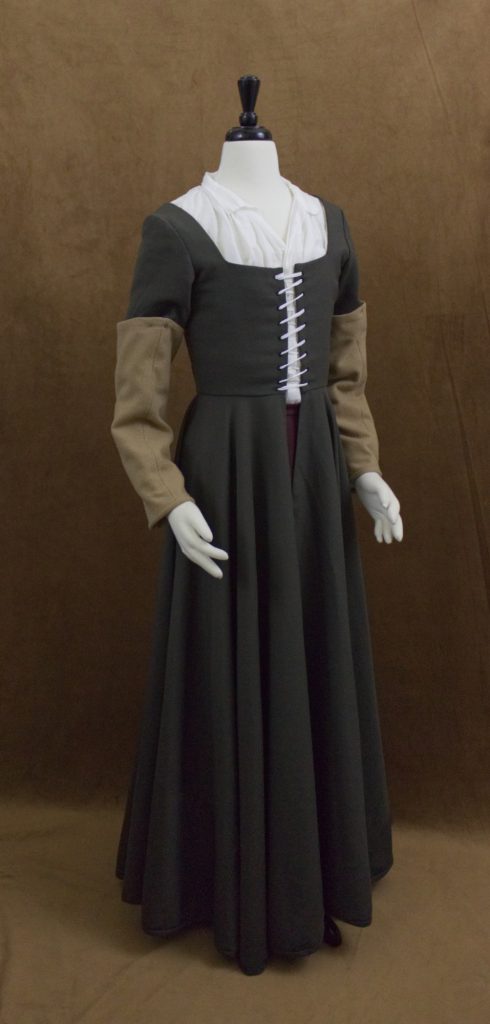
I started this kirtle in 2014/2015 cutting it from the leftover yardage of the olive fitted gown and an old bodice block I drafted on newspaper. This kirtle differs from ones I’ve made before in that it has a very full skirt (possibly too full) and half sleeves.
Images from the Da Costa Book of Hours at the Morgan Library and Museum served as my main inspiration for the half sleeves. I did not try for the deep V back neckline, I have sloped shoulders and have had issues with the straps pulling if I go too low in the back.
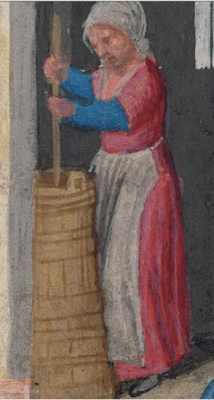
A woman churning butter – Da Costa hours Illuminated by Simon Bening (1483/84–1561)Ghent, Belgiumca. 1515MS M.399, fol. 5v 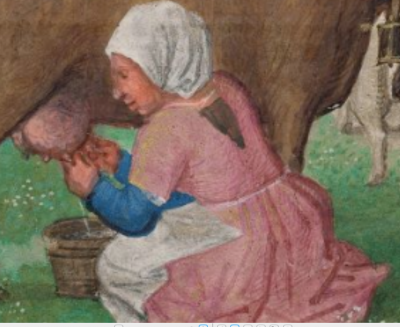
A woman milking a cow – Da Costa hours Illuminated by Simon Bening (1483/84–1561)Ghent, Belgiumca. 1515MS M.399, fol. 5v The whole project lived in a large shoe box through two moves, getting taken out from time to time, worked on and then returned to the box.
This year I was determined to finish it. If only to make sure I wouldn’t misplace the half sleeves again.
I already sewed the skirt together, so that left me with the bodice to wrangle.
Building the Bodice
- Pad stitch interlinings by hand
- Flatline to bodice
- Cut bodice linings
- Baste bodice and try it on
- Adjust the bodice to fit and piece shoulder seams
- Sew the bodice
- Hand sew in the bodice lining
- Hand sew the eyelets in black silk twist
- Sew shoulder straps
- Test fit sleeves and cut the lining
- Sew sleeves
- Set the sleeves
- Bind the armscye
To piece the shoulder straps I made small lined rectangles and whip stitched them in by hand. I’ve done this a few times before, but I’m not fond of how bulky the area becomes with all the seam allowances building up in that small area.

The sleeve head is looking a little sad in the photos because I have mannequin arms stuffed and pinned onto a dressform they did not come with.
Once the bodice was together I attached the skirt by hand and folded over the bodice lining to hide the join. When I got ready to level out the skirt I realized in my excitement to get every bit of skirt out of the fabric I had I went a little overboard. I was looking at a 6 yard hem to level and bind.
Speaking of binding, I was down to a handful of scraps.
This became frankenbinding. Some strips were on the straight, some on the bias, the widths varied and once I had all the binding sewn on I was still 6 inches short. So I pulled some slightly darker wool from the stash and used that.
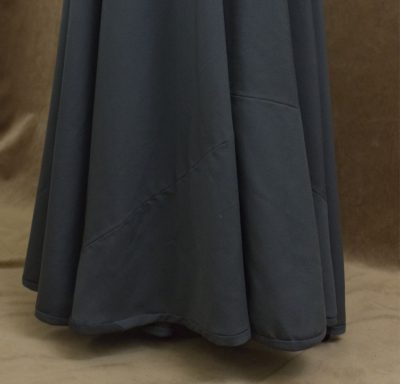
Once the hem was bound, pressed, steamed and clapped into submission I faced the cold hard reality that leaving my skirt unlined was a mistake. The wool I used for the kirtle is tropical suiting weight, this makes it very breathable and easy to wear but it does like to fray when cut along the straight. Now it was not fraying like some brocades do when you look at them, but it was enough that clipping the threads that worked their way lose would be bothersome.
So I hand sewed the seam allowances down in a bastardized stitch that is a mix of the prick stitch, the running stitch and the back stitch in black silk thread.

The final finishing was reinforcing the stress points along the kirtle with a very fine whip stitch at the corners of the bodice front and back and at the front skirt seam opening.
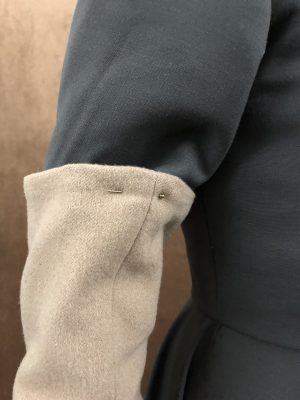
The Half Sleeves

Sleeve fabric choices The caramel wool over sleeves are a mixture of machine and hand sewing. I used my green half sleeves as a pattern and made them a little longer and a little roomier. All in all it is just a two part tapered rectangle. I sewed the wool and the linen lining up on the machine. Pressed. Matched the seams at the top and sewed the tubes together and turned them out. To finish hem off I bound the bottom edges in stripes of the wool and finished them by hand. I decided on the bottom edge as that is where these will get the most wear and tear over time and the binding is easy to replace.
The sleeve pin on to the upper sleeve with my handmade brass pins.


-
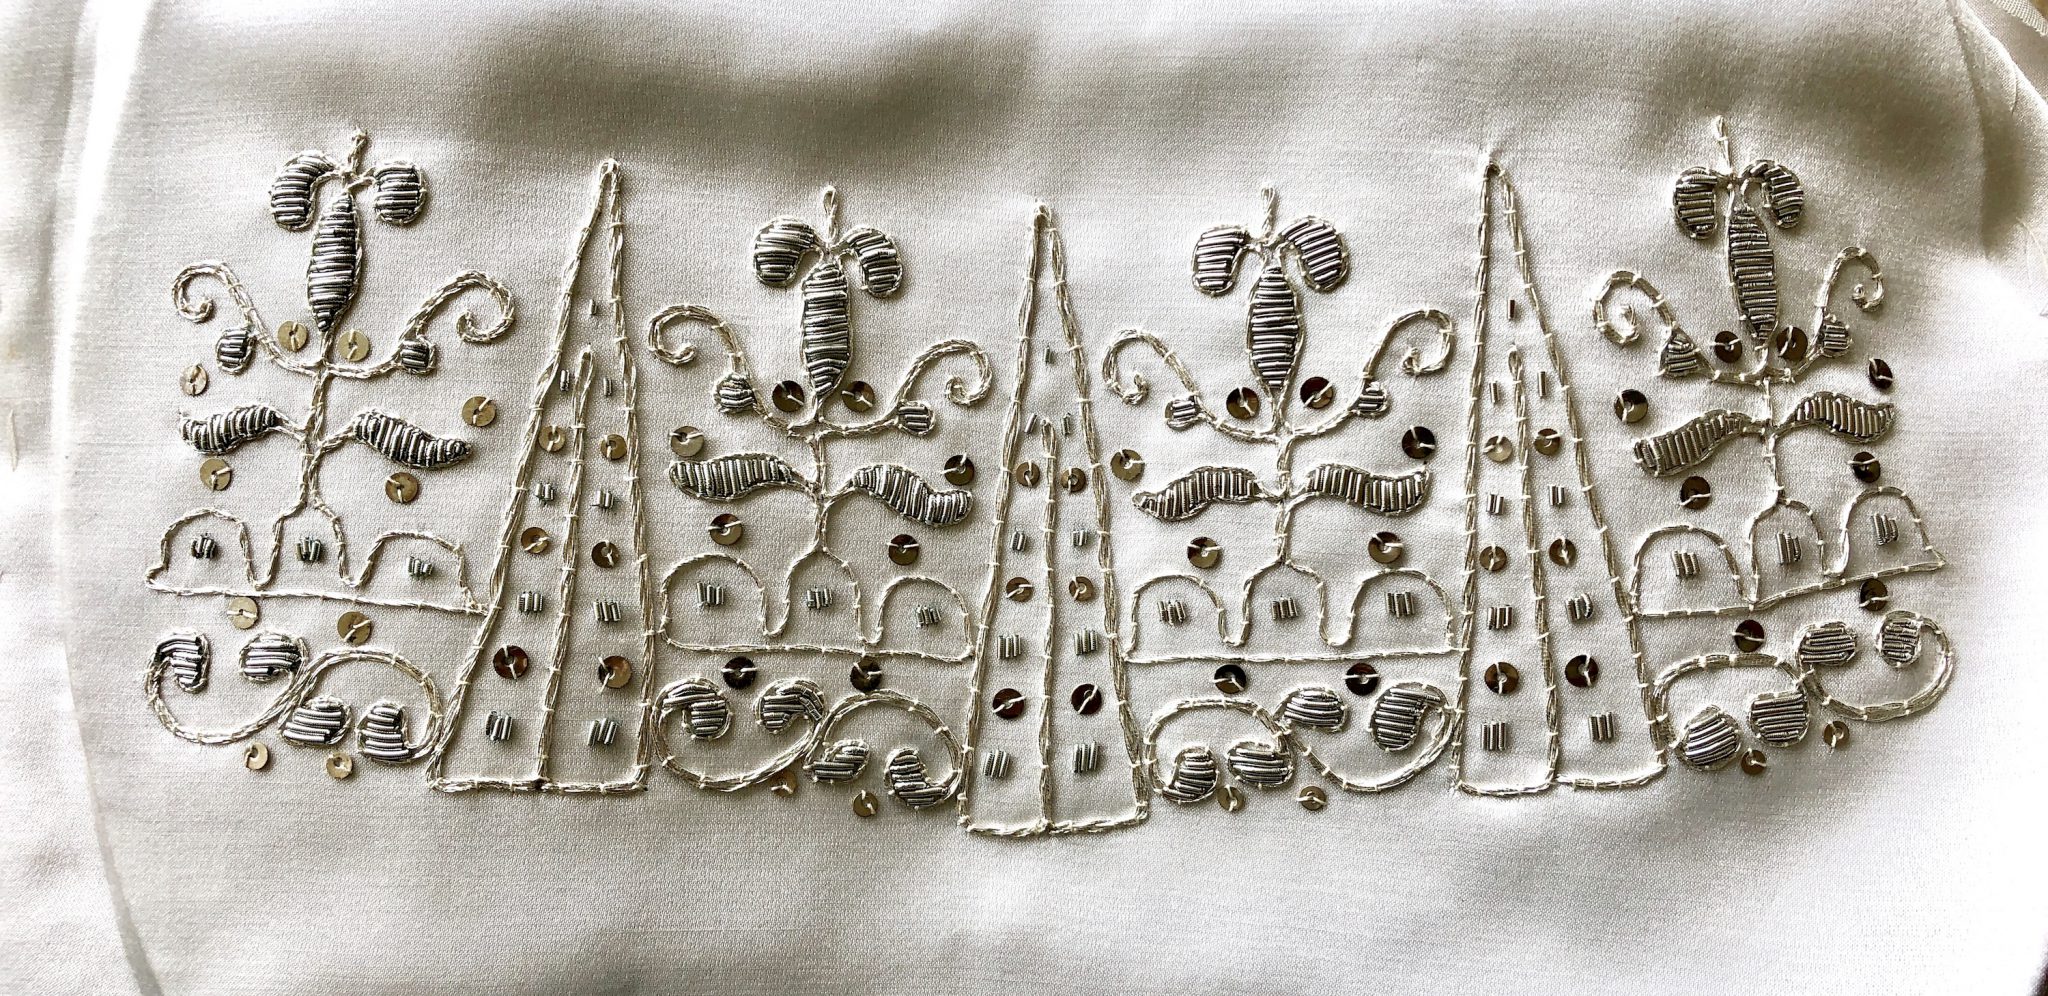
The First Embroidered Glove Cuff is Done!
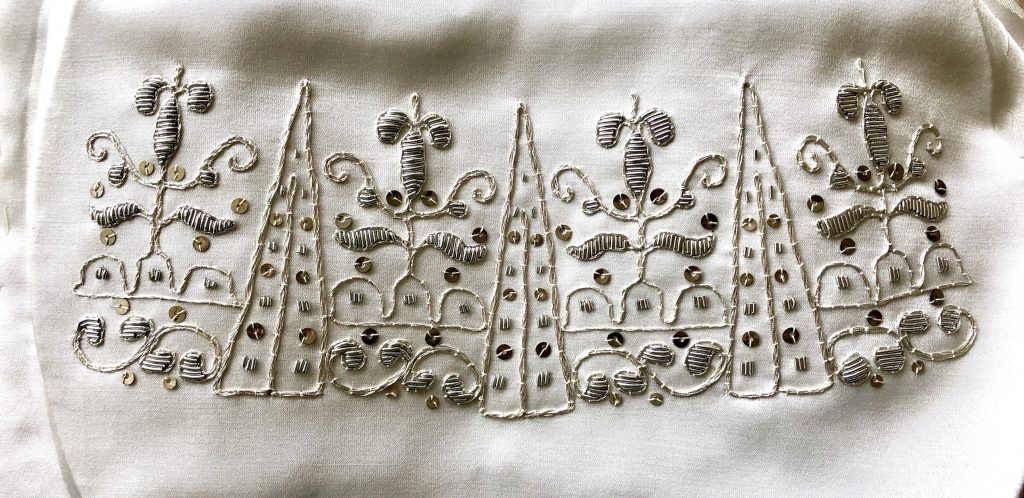
Spangles, silver purl, silver plated thread I twisted into cord, and many yards of cream silk thread. The first cuff is done and now I get to do it all over again for the second cuff.
-
A Green Linen Apron and some 17th Century Goldwork Embroidery Projects
April and most of May was a very stressful month for me. All my sewing projects went on hold and I tried to take the time to put myself and self-care first when I could. I’m starting to feel like I have more energy now, I’ve gotten some hand sewing done and started a few embroidery projects that will carry me out until the end of the year.
First up is a simple linen apron in sage green. I hand sewed this all with white linen thread and clocked in at about 10 stitches per inch. Those hems are going nowhere. Using a contrasting thread gave an extra decorative effect and I may make another one for the etsy shop.
The embroidered stomacher project is back under the machine once more. I took a break to keep my shoulders and neck happy and rethinking my workroom set up for when I need to spend a lot of time at the machine.
The silver glove cuffs are on hold, because I fell in love with a much more colorful set of gloves from the V&A.
These are also featured in 17th Century Women’s Dress Pattern Book 2. Mine will not be an exact reproduction (I’m not fond of the tabs with the houses) but will be similar.
And finally, to get a little more practice with goldwork and working with purl I started a much smaller, less ambitious project. This is based on the 17th-century purse and pincushion at the V&A. Which features purl worked flowers, couched cording and tiny birds covered in seed pearls. There are no measurements listed so I am taking a guess at the size of the pincushion, based on others that survive.
Some sections of the flowers and leaves I padded out with linen thread, the gold cord I twisted myself with a drill, and in place of seed pearls I am using some white seed beads I had in my stash.
-
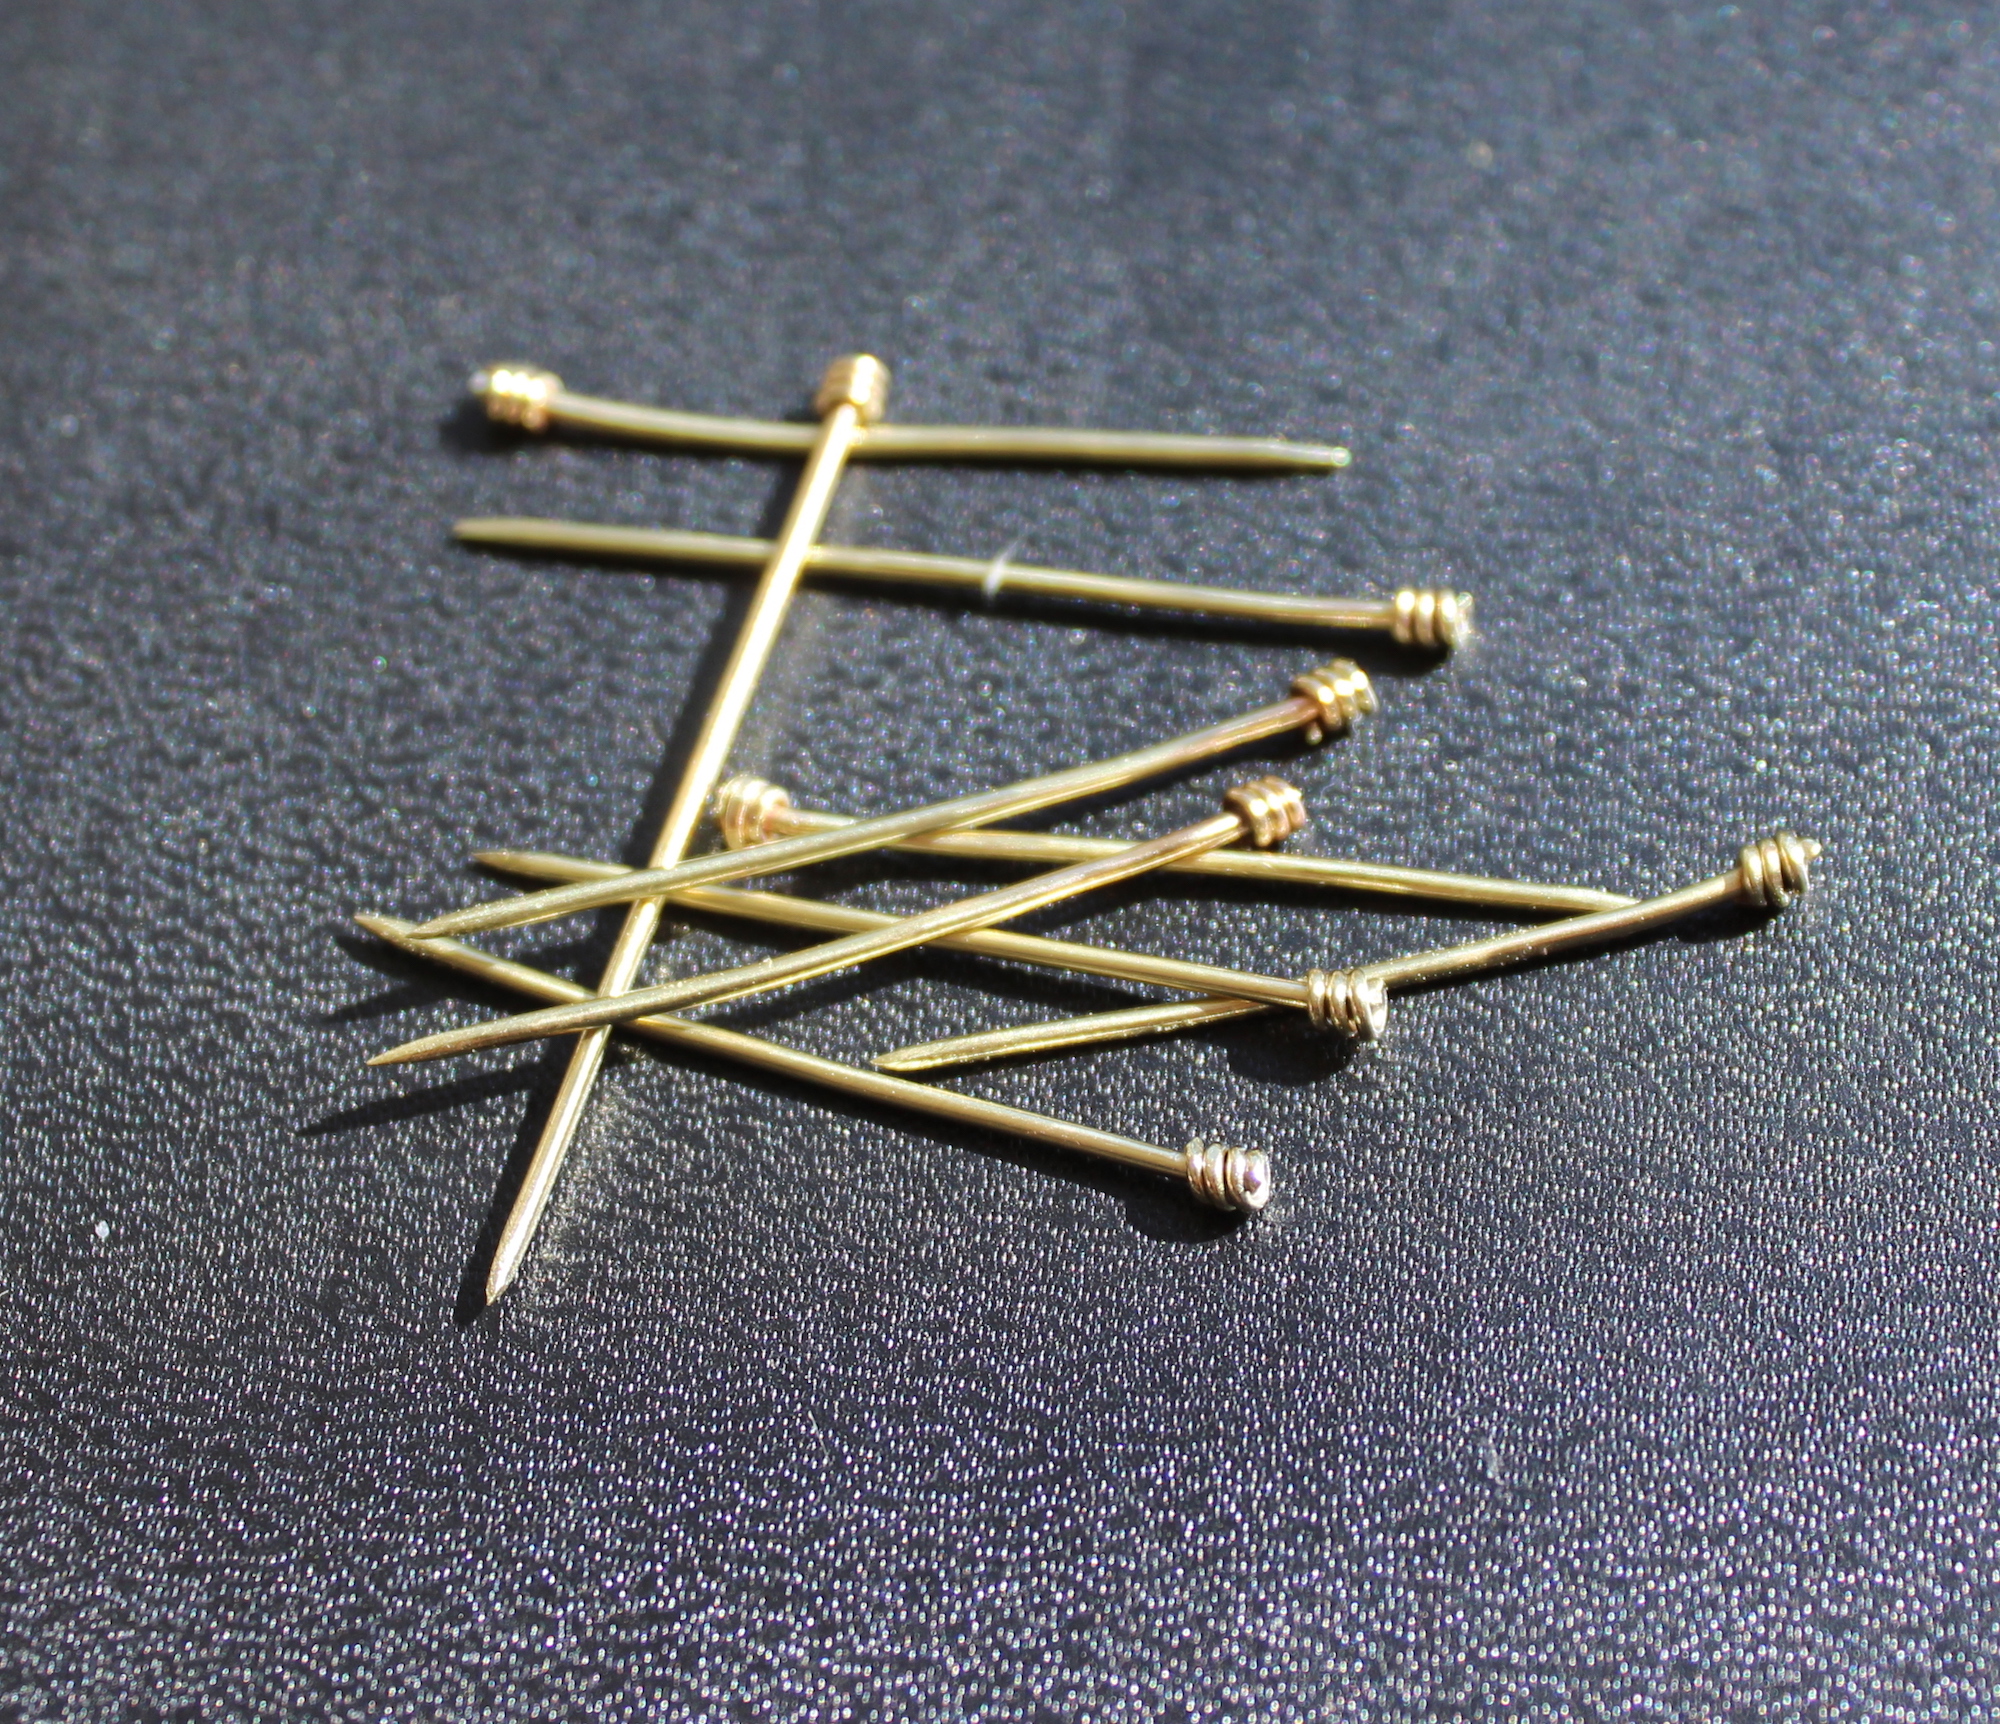
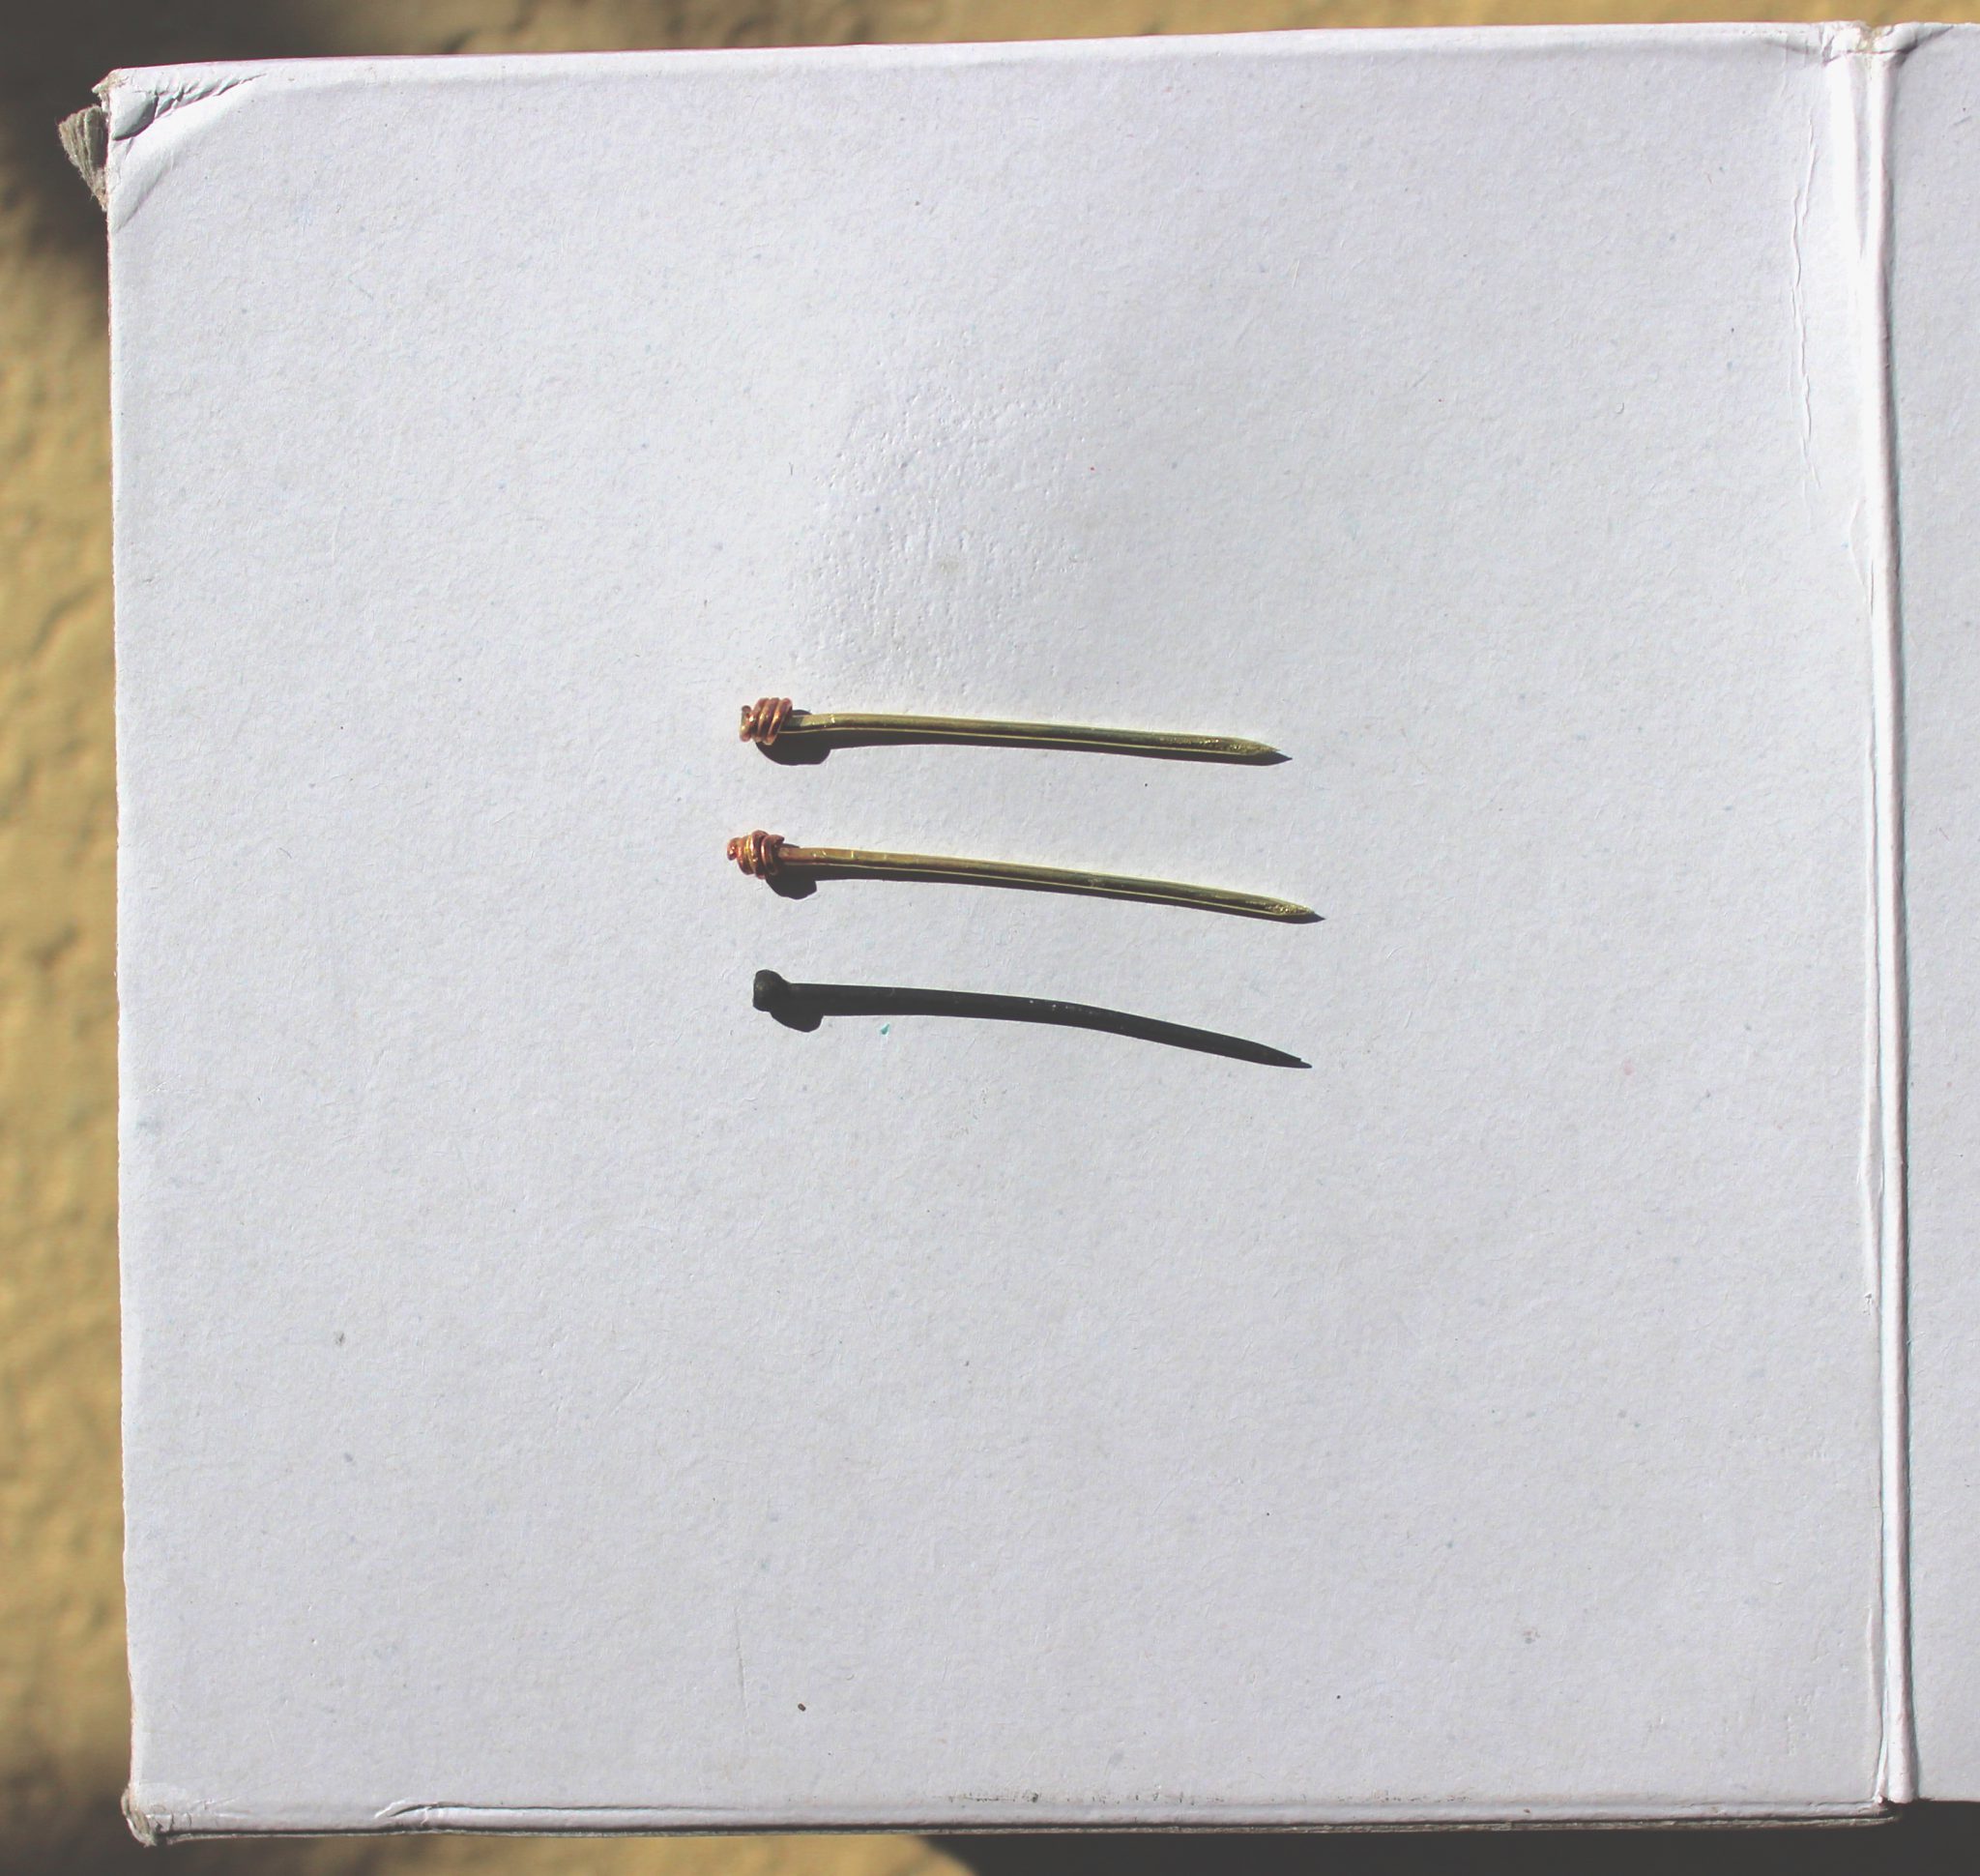
16th Century Brass Pins
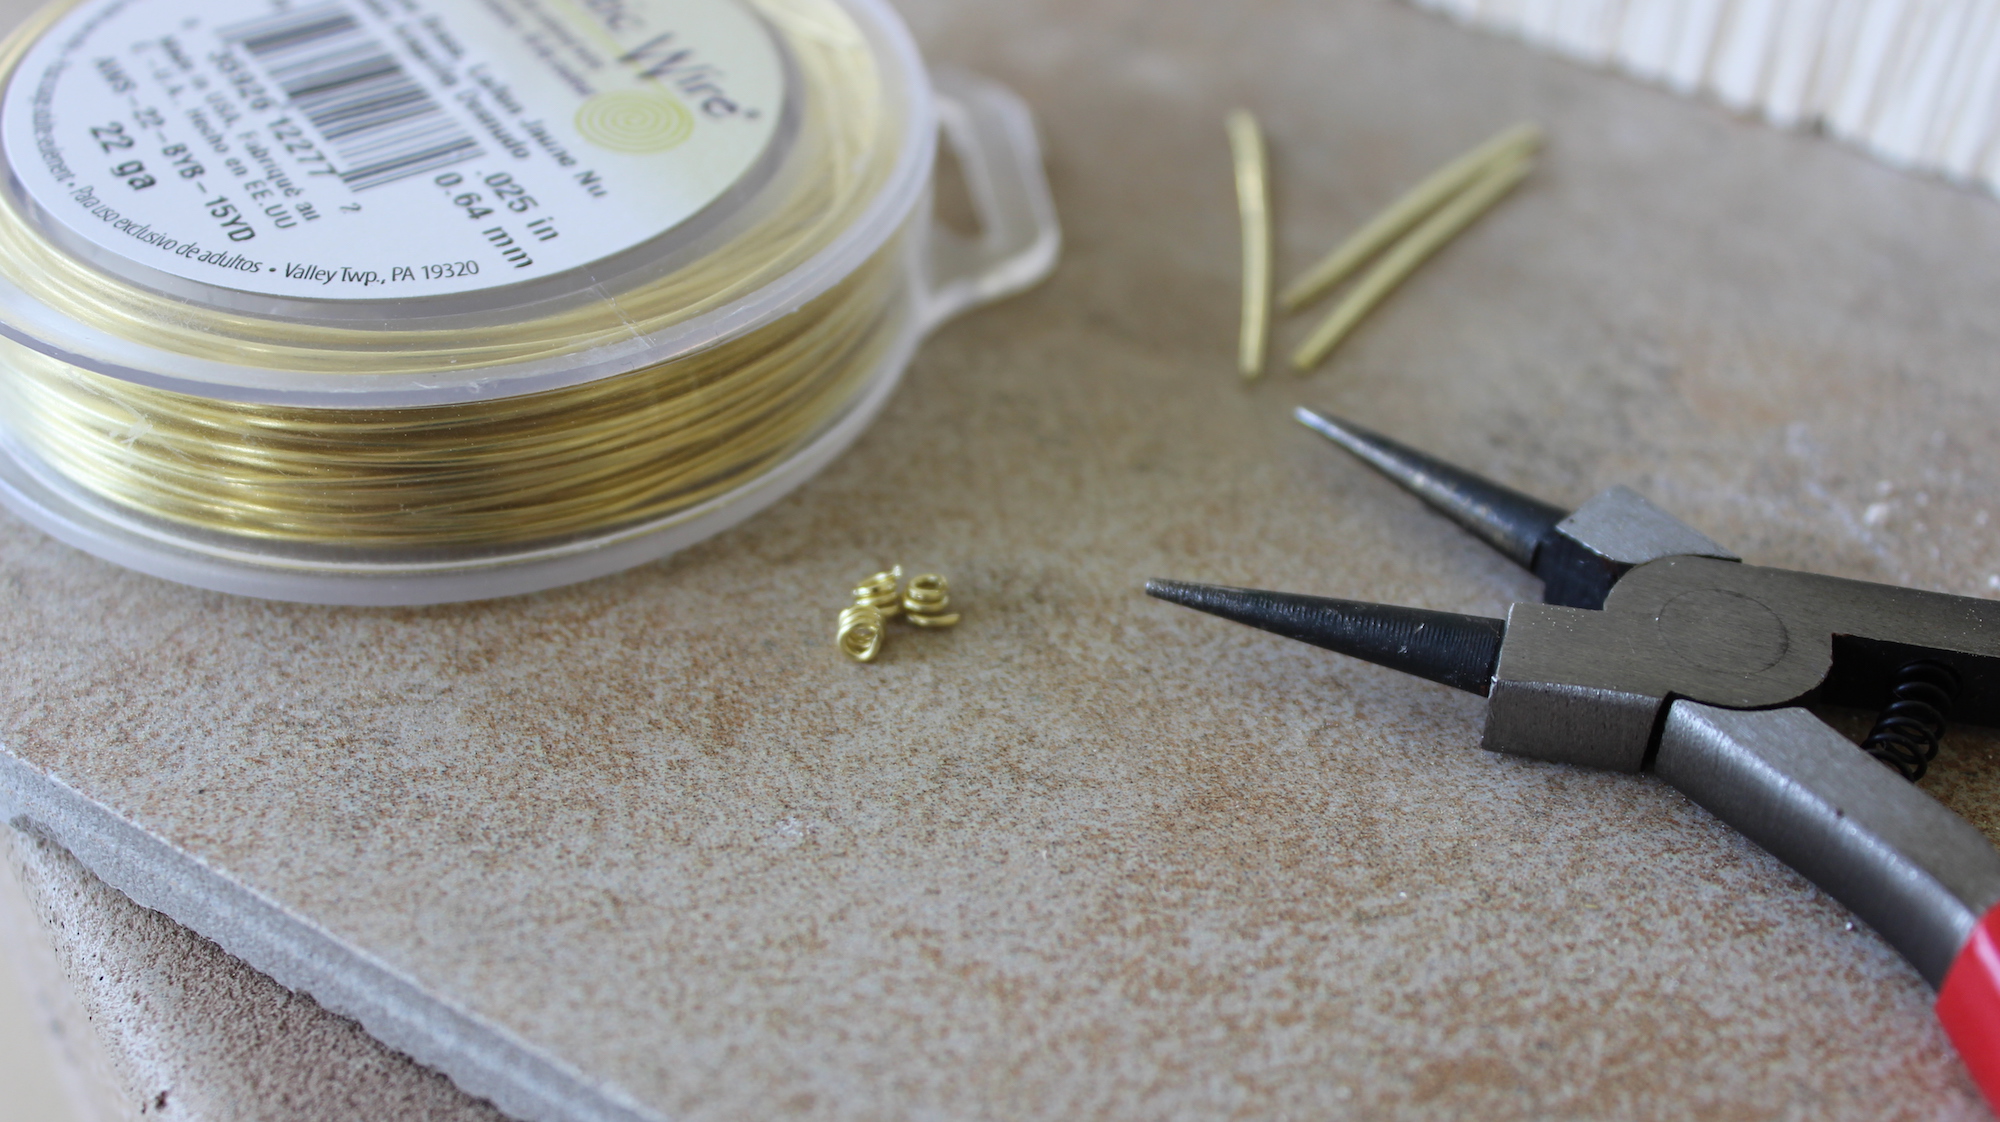
For Christmas, I got myself a butane-fueled jewelry torch along with brass wire of various gauges, gold colored hard solder, and other accouterments. I have several projects planned but for now, I need lots of practice with the torch.
Brass pins are just the right amount of fiddleyness for a beginners project and each time I’ve made some I’ve learned something new. Also, shout out to Scott of The Renaissance Artisan for his in-depth work on the history of pins and pinners and who made this process much easier.
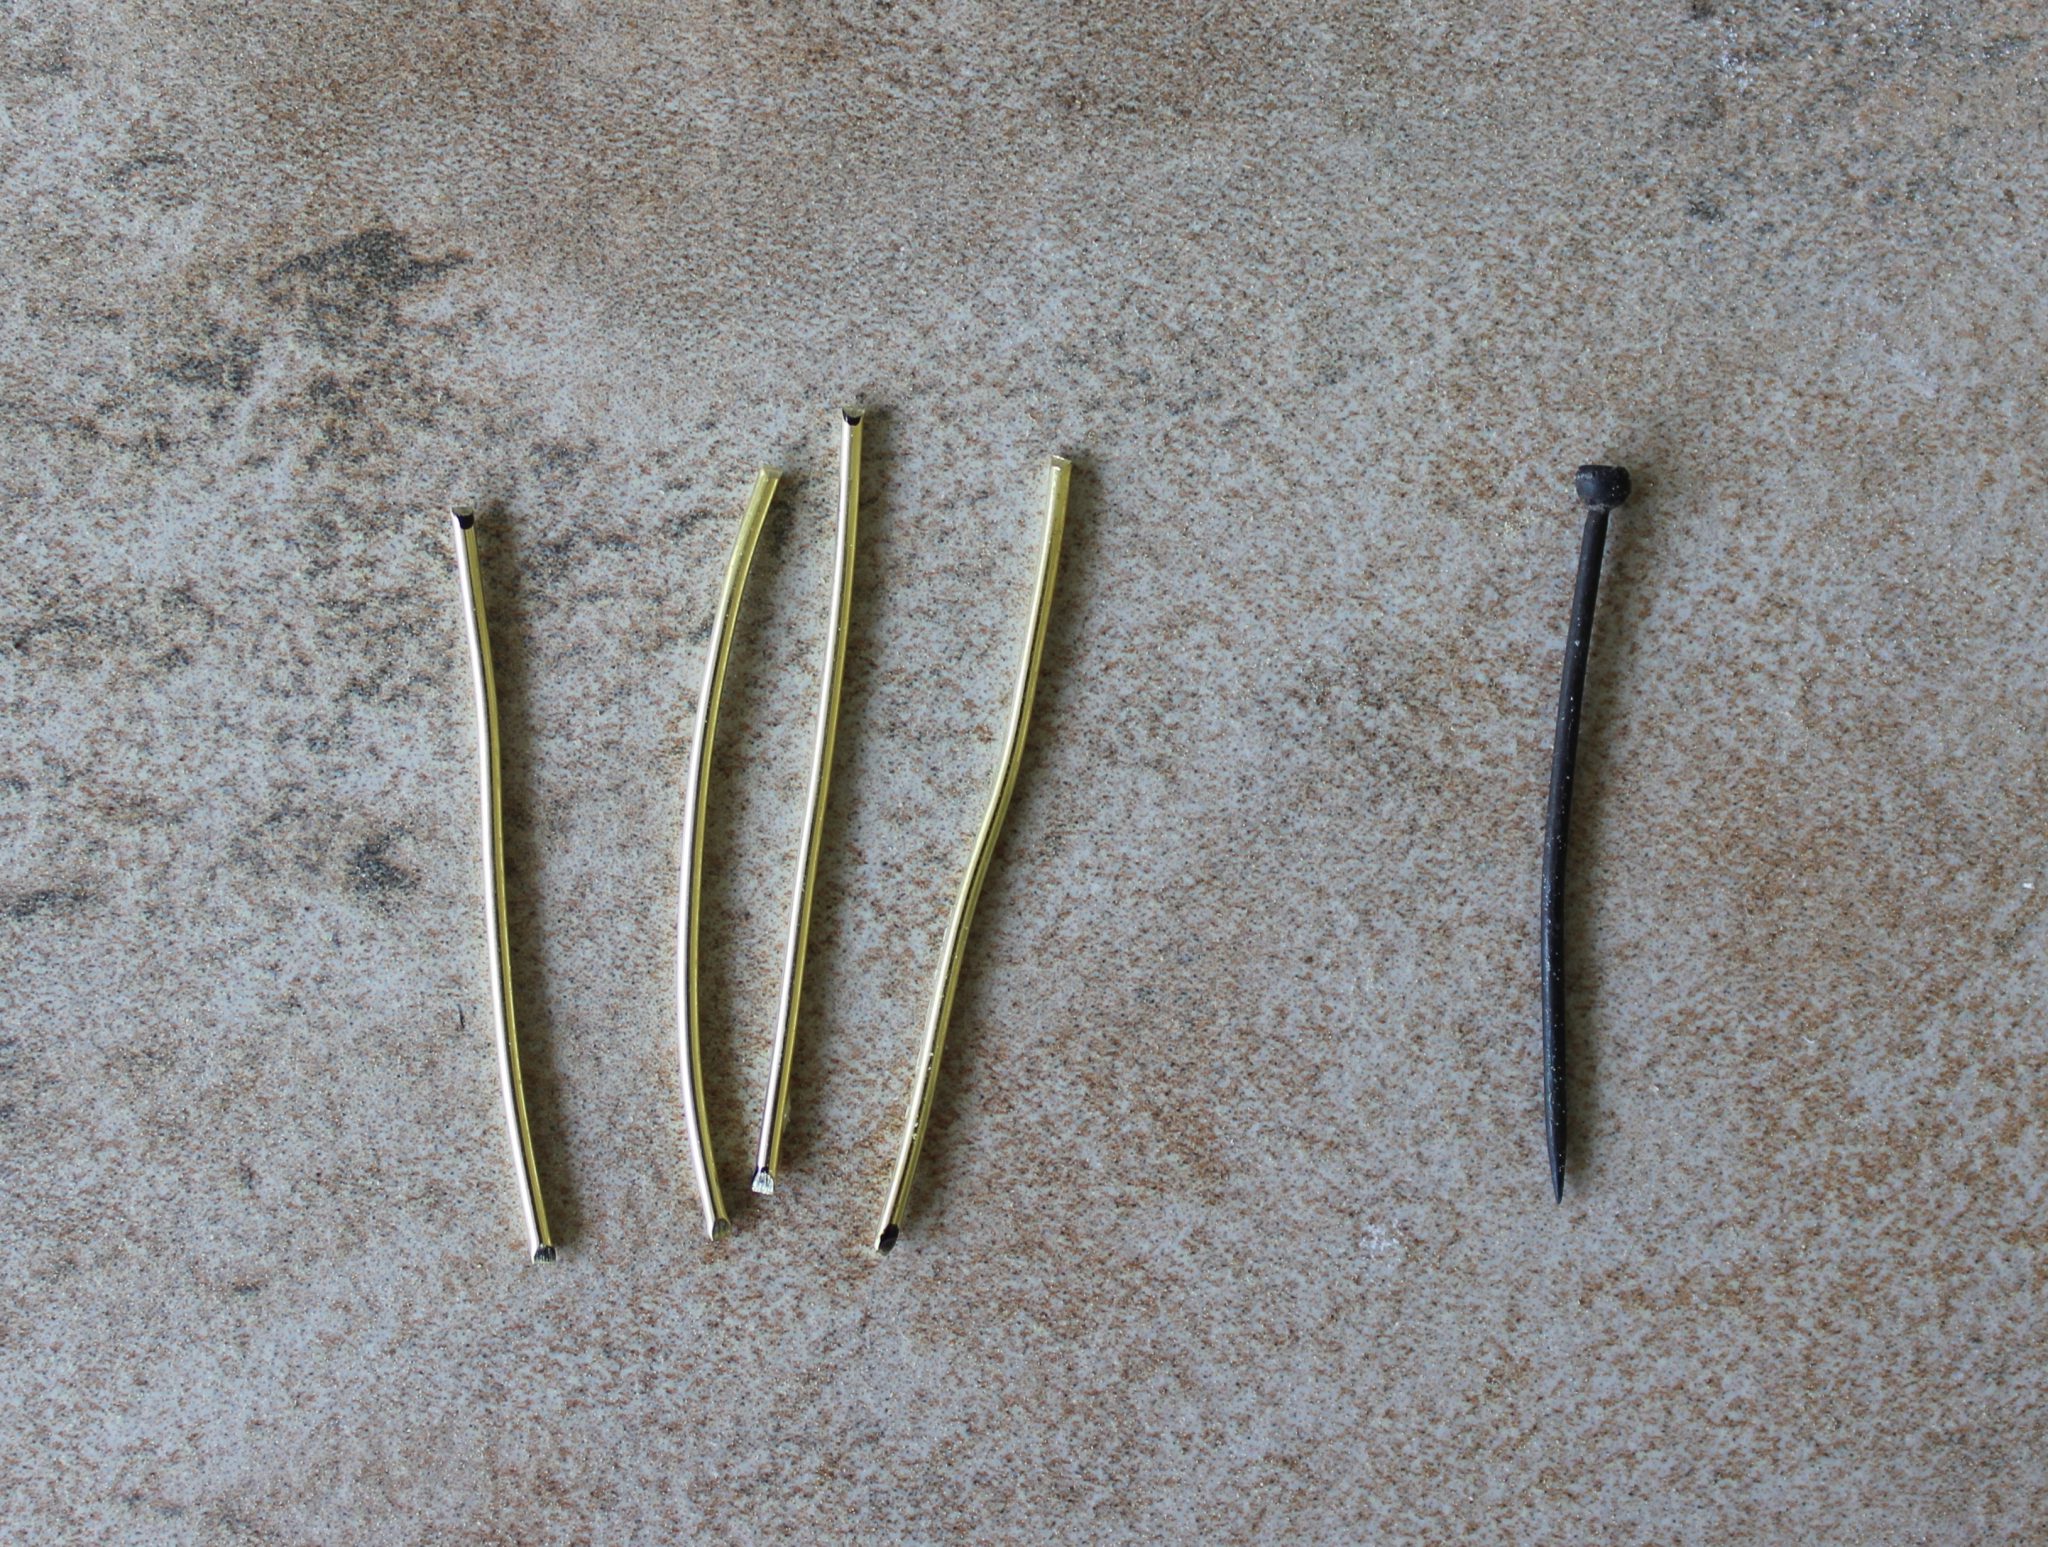
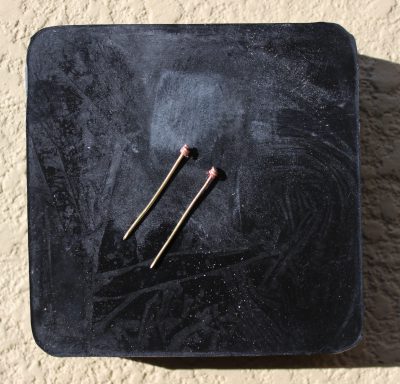
I have in my collection a small 16th century Dutch pin that I am using as a base. The wire it was made with is about 18 gauge and it is 34mm long.

Brass wire next to original pin I start by trimming my brass wire into small sections with my flush cutter and filing one end flat.
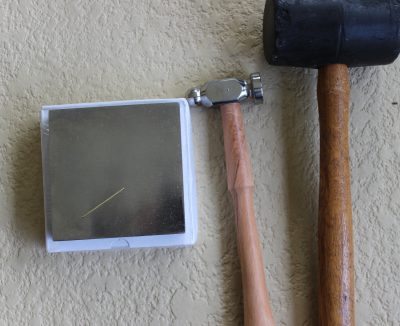
Work hardening brass wire Next, I work harden my wire on my bench block with a rubber mallet. While this works, it isn’t optimal. On my next batch of pins I rolled the wire between a wooden cutting board and my bench block.
This works much better for hardening and straightening the small lengths of wire without the risk of pinched fingers. Ouch!

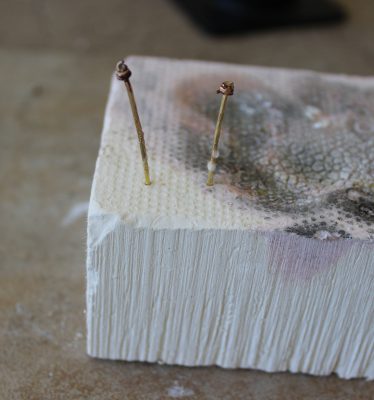
Brass pins after the first pass of sharpening After work hardening the wire I give each pin a rough point with a crosscut file. In the 16th century, a pinner’s bone would be used to help position and angle the pin for filing. I don’t have one so I filed a small notch into my wooden cutting board.
This is something I need to practice. While getting a sharp point is easy, getting a smooth taper can be tricky and if your wire is not hardened enough it likes to bend.

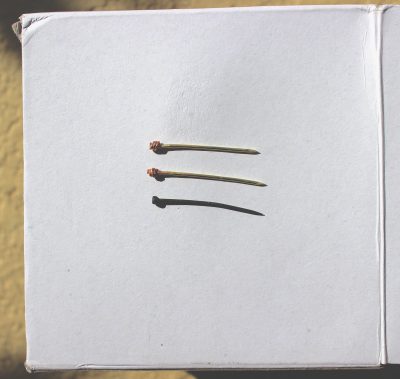
For the pinheads I’m using round nose pliers to make little spiral hats from 22 gauge brass wire. My plier points are not as thin as the 18 gauge wire so I found this process extremely frustrating. The pinheads end up slightly too large for the wire and I had to individually tweak and adjust the top of each spiral so it wouldn’t fall down the pin shaft.
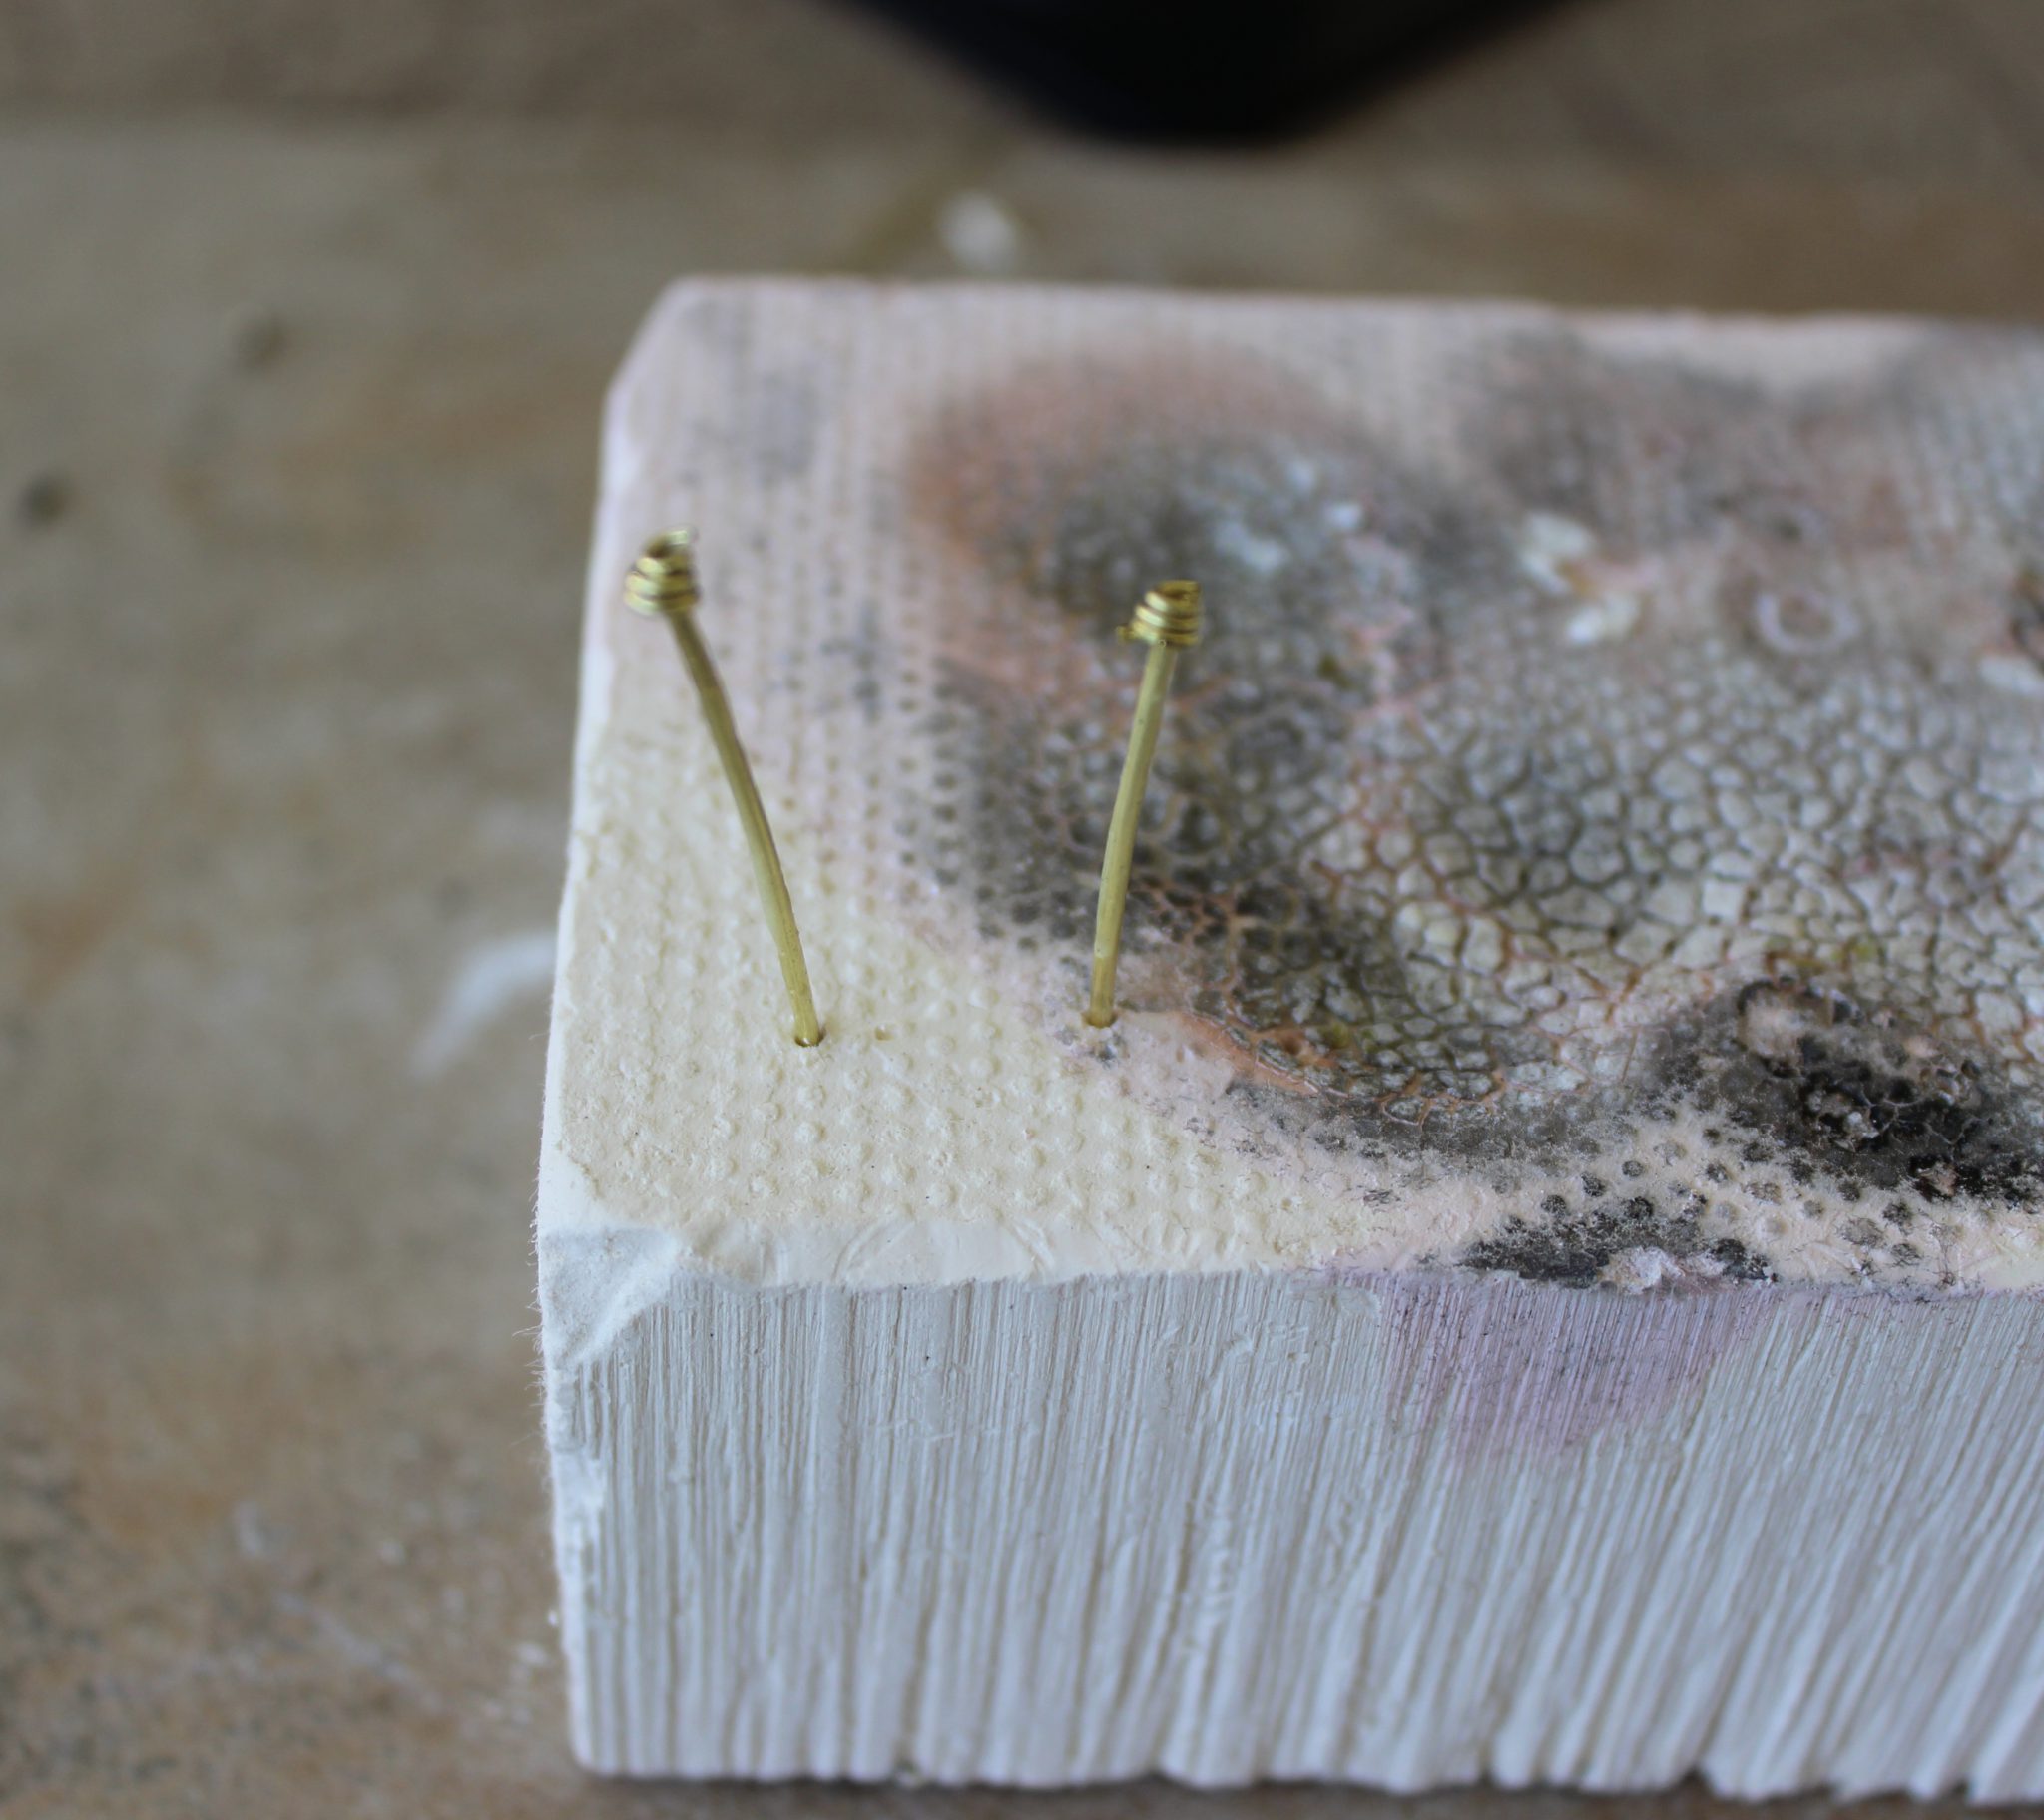
On my second batch I wrapped the pinhead wire around the pin shank as it was done in period. This was slightly less frustrating and had the added benefit of not needing to adjust the tiny coils and took out the extra step of fluxing the pinheads in place before soldering.

Brass pins with wrapped wire heads I poked a few holes into my soldering block to hold the pins upright and then fluxed and soldered each pinhead in place.
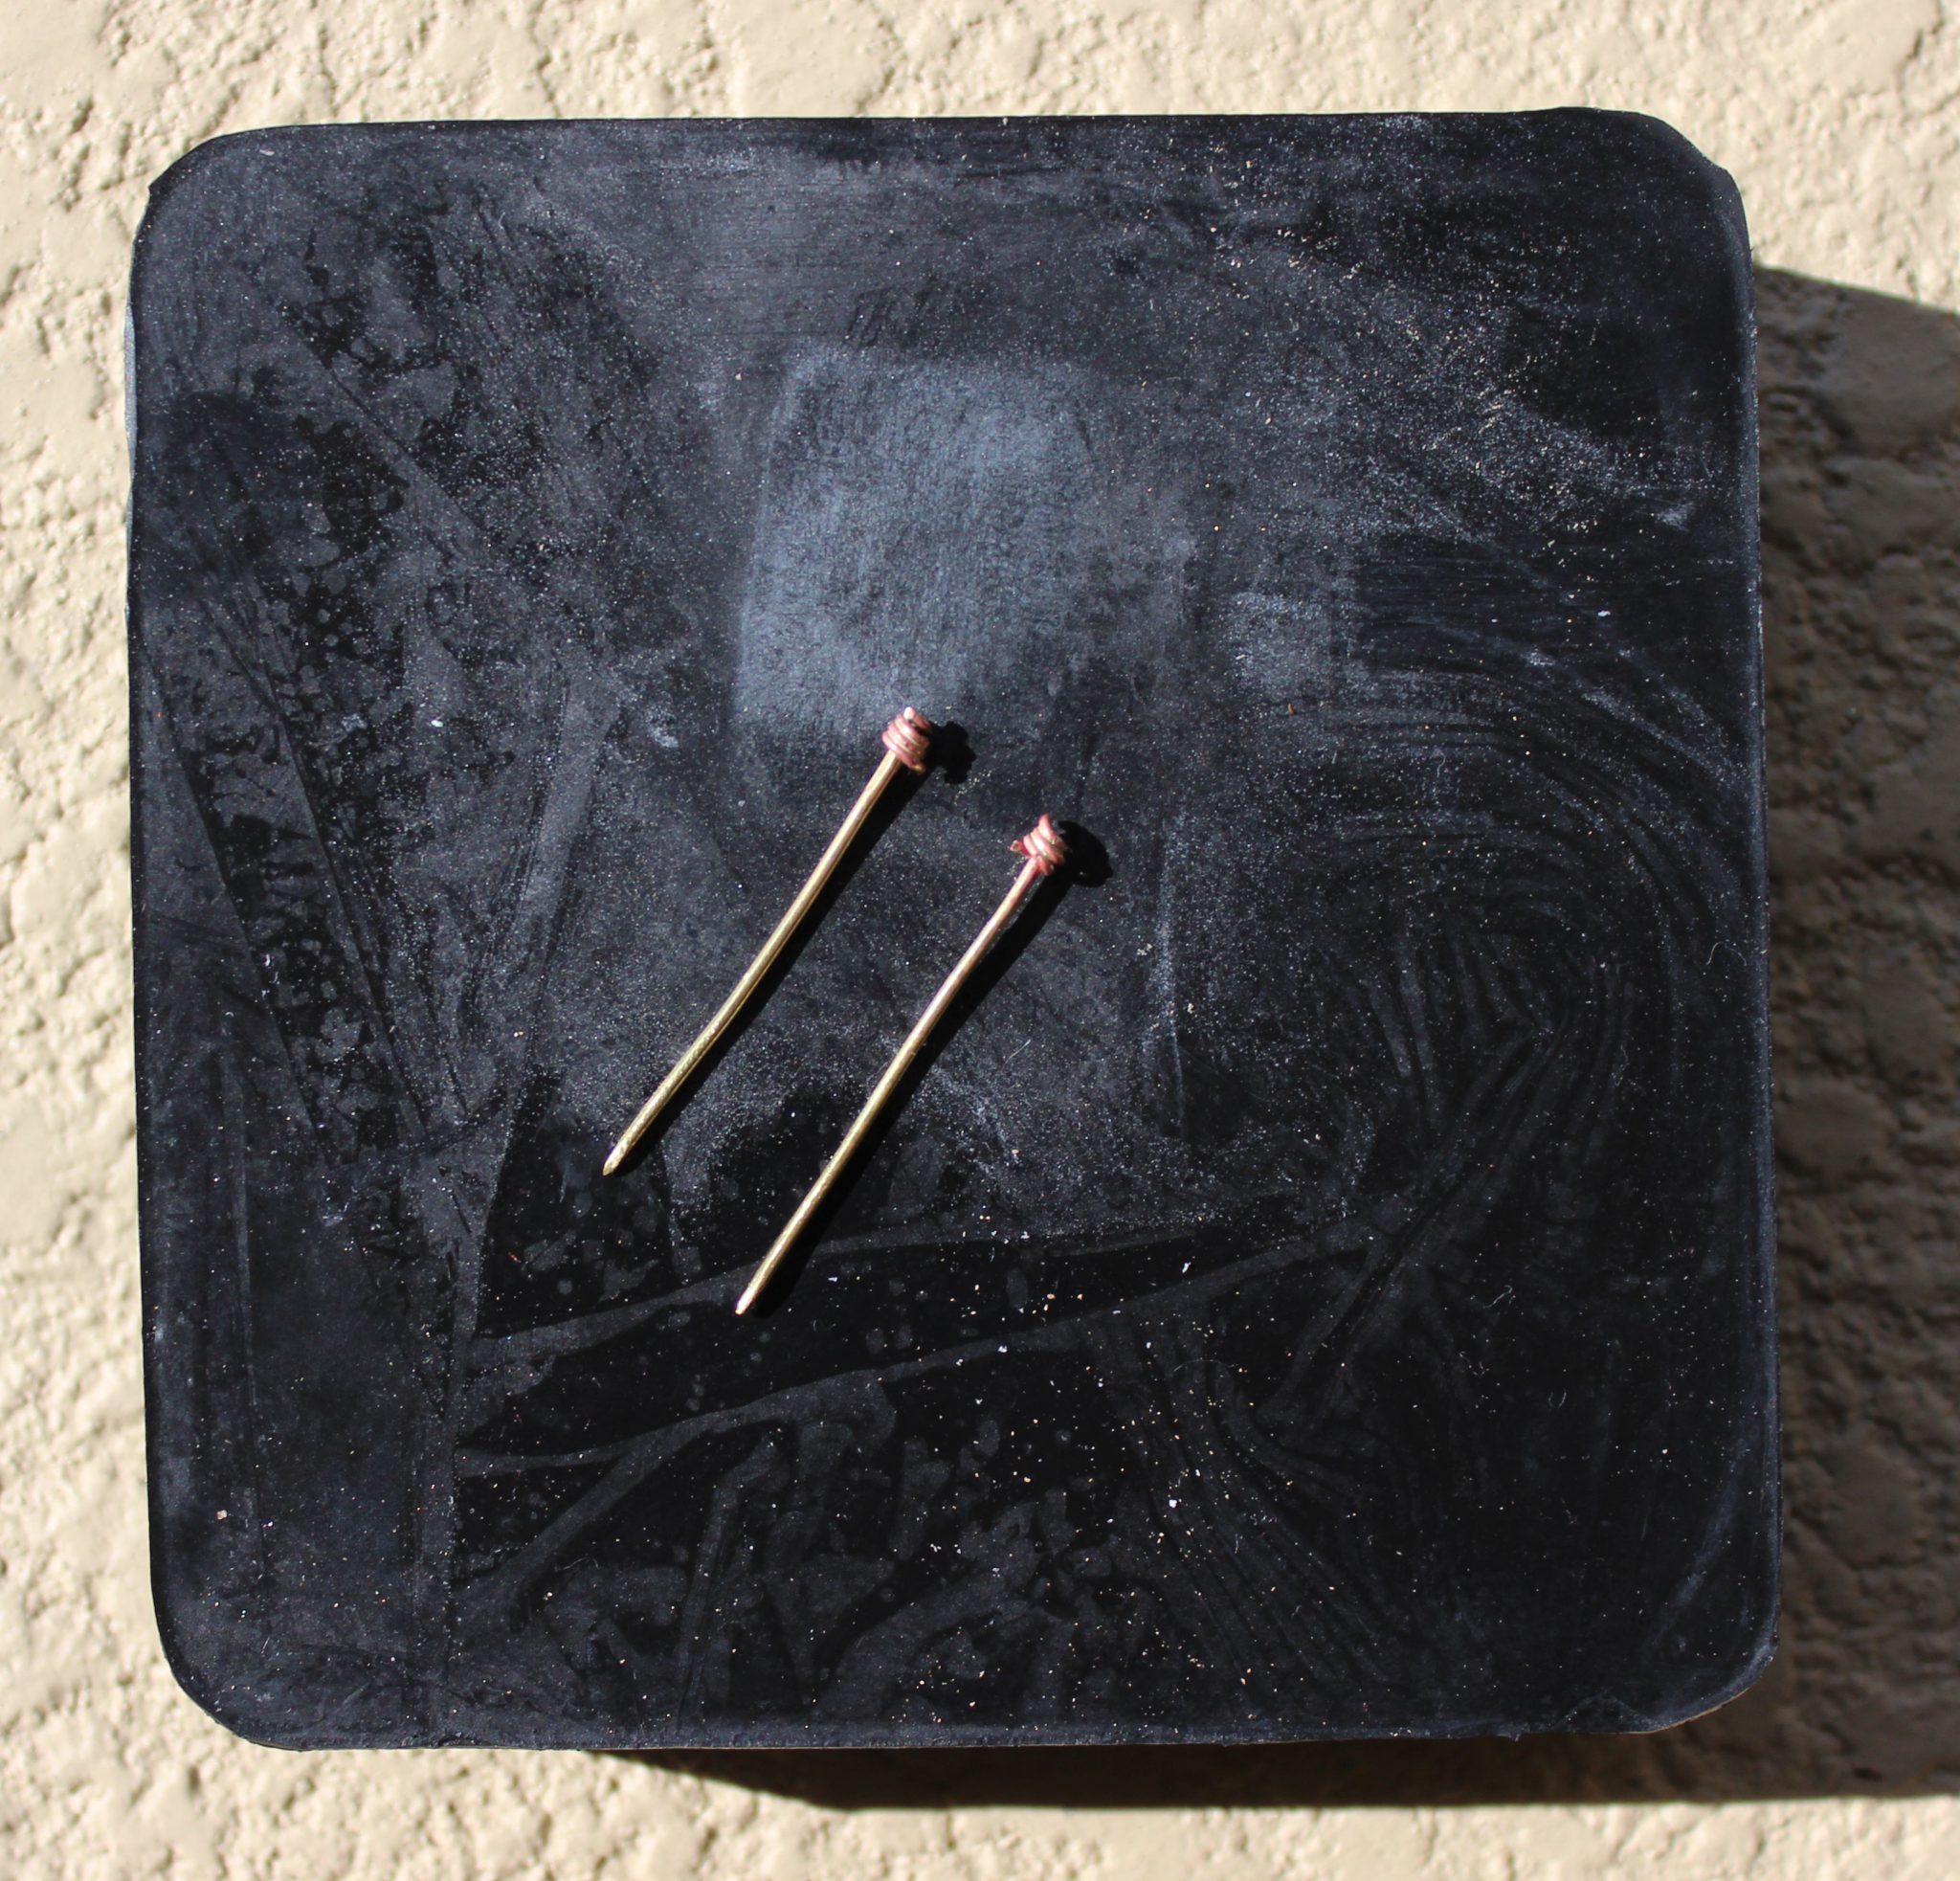
Brass pins after torch firing After soldering the pins are dirty covered in flux and oxidation. Ew!
Pins after coming out of the pickle. To clean them I put them in a solution of white vinegar and salt, this eats away at the baked on flux and oxidation. It also brings a thin layer of copper to the surface of the brass. I might be able to prevent this by adding some hydrogen peroxide to the pickle but for now, the copper comes off with some polishing.
Brass pins before clean up with original 16th-century Dutch pin on the bottom. 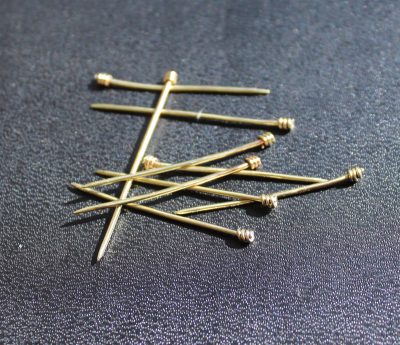
Brass pins after polishing -

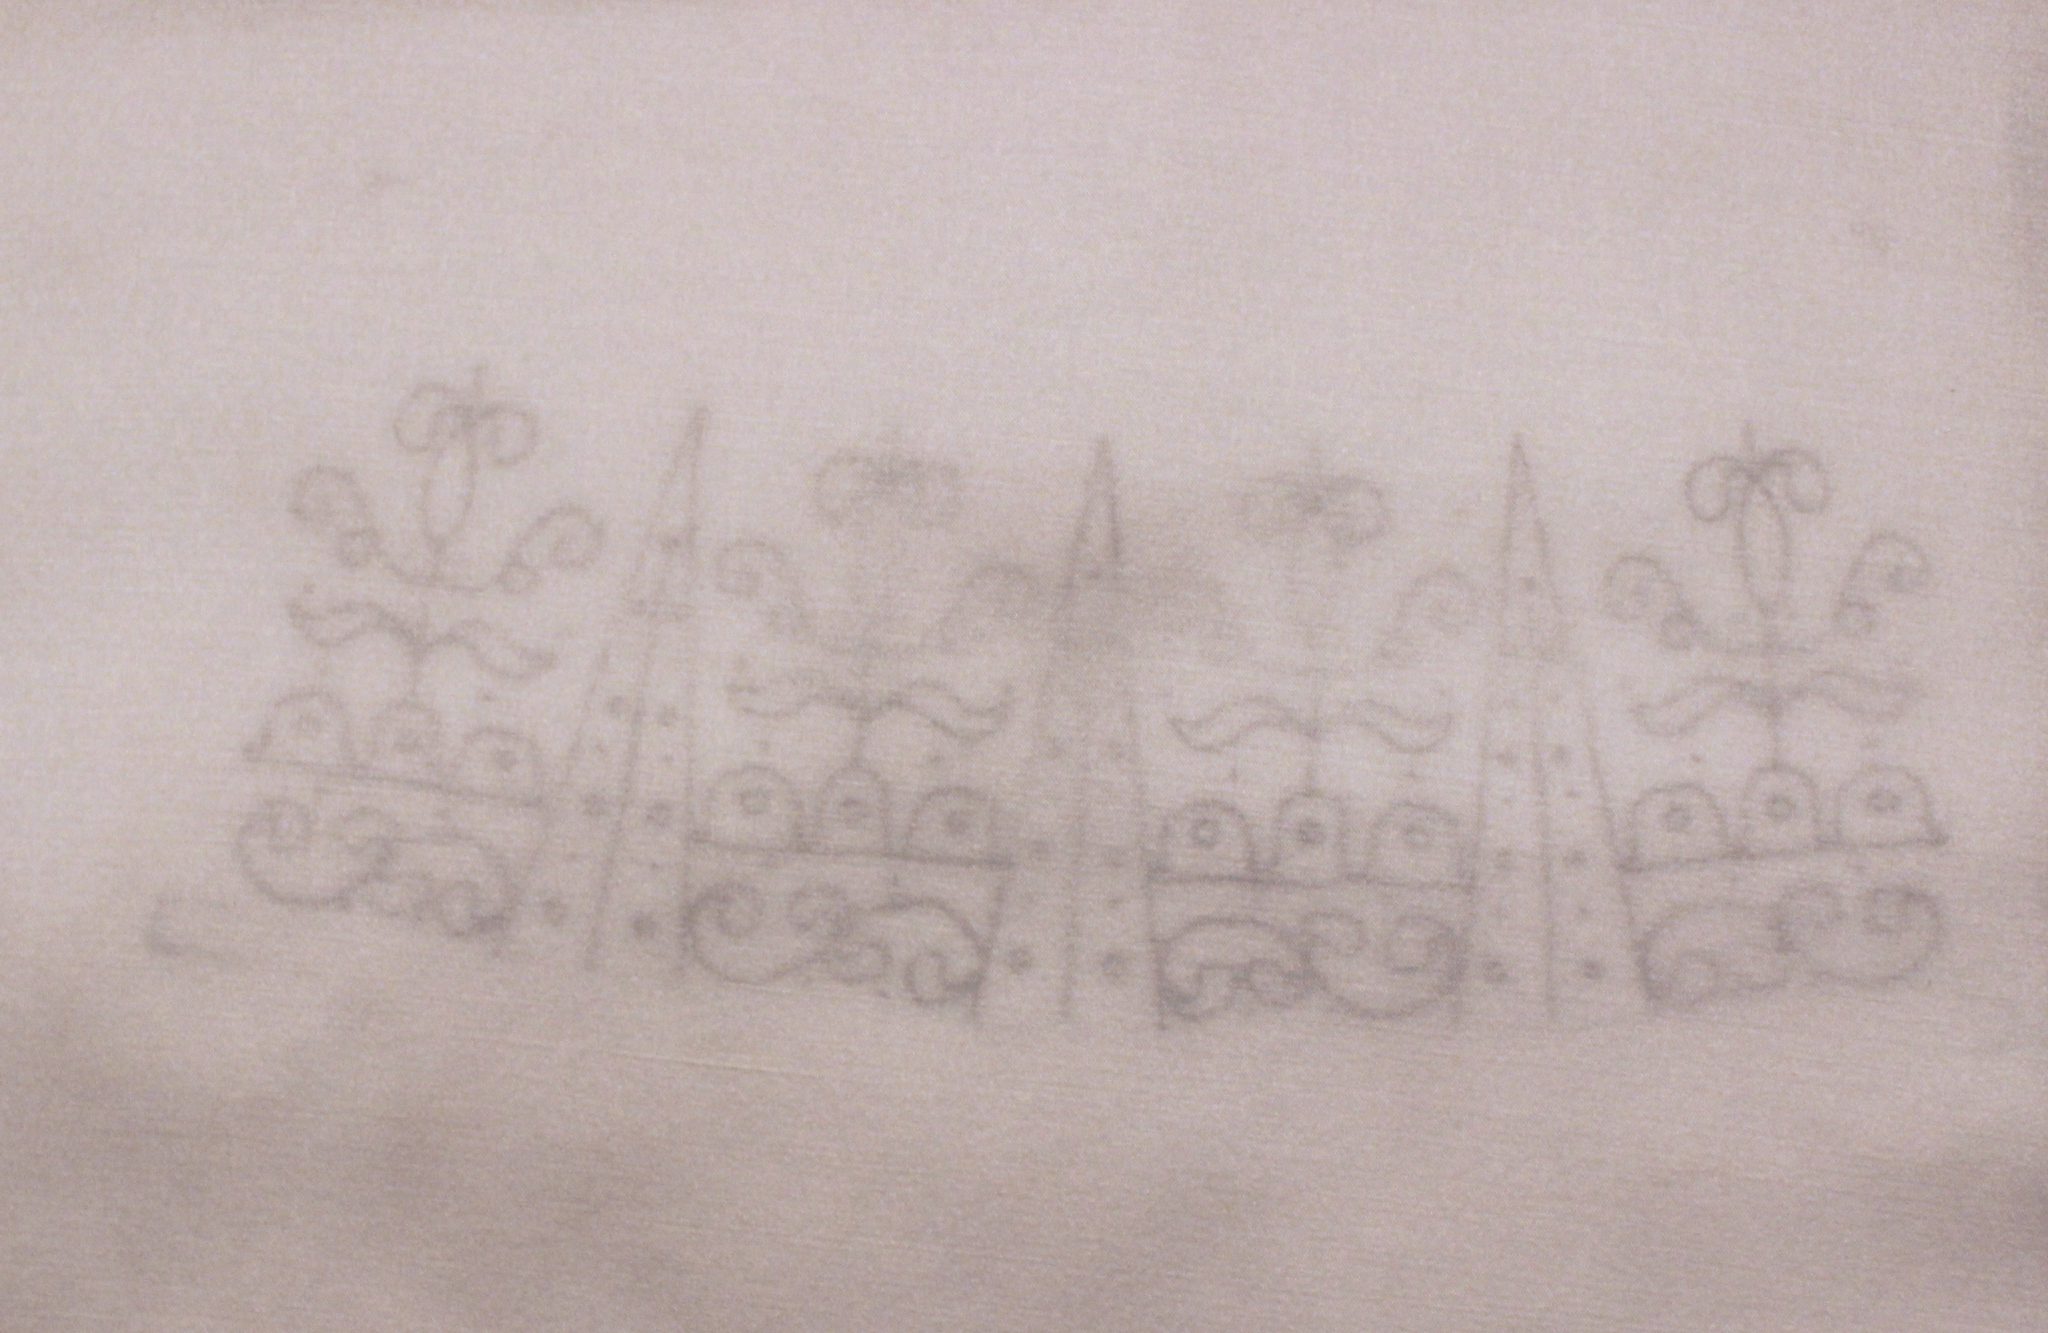
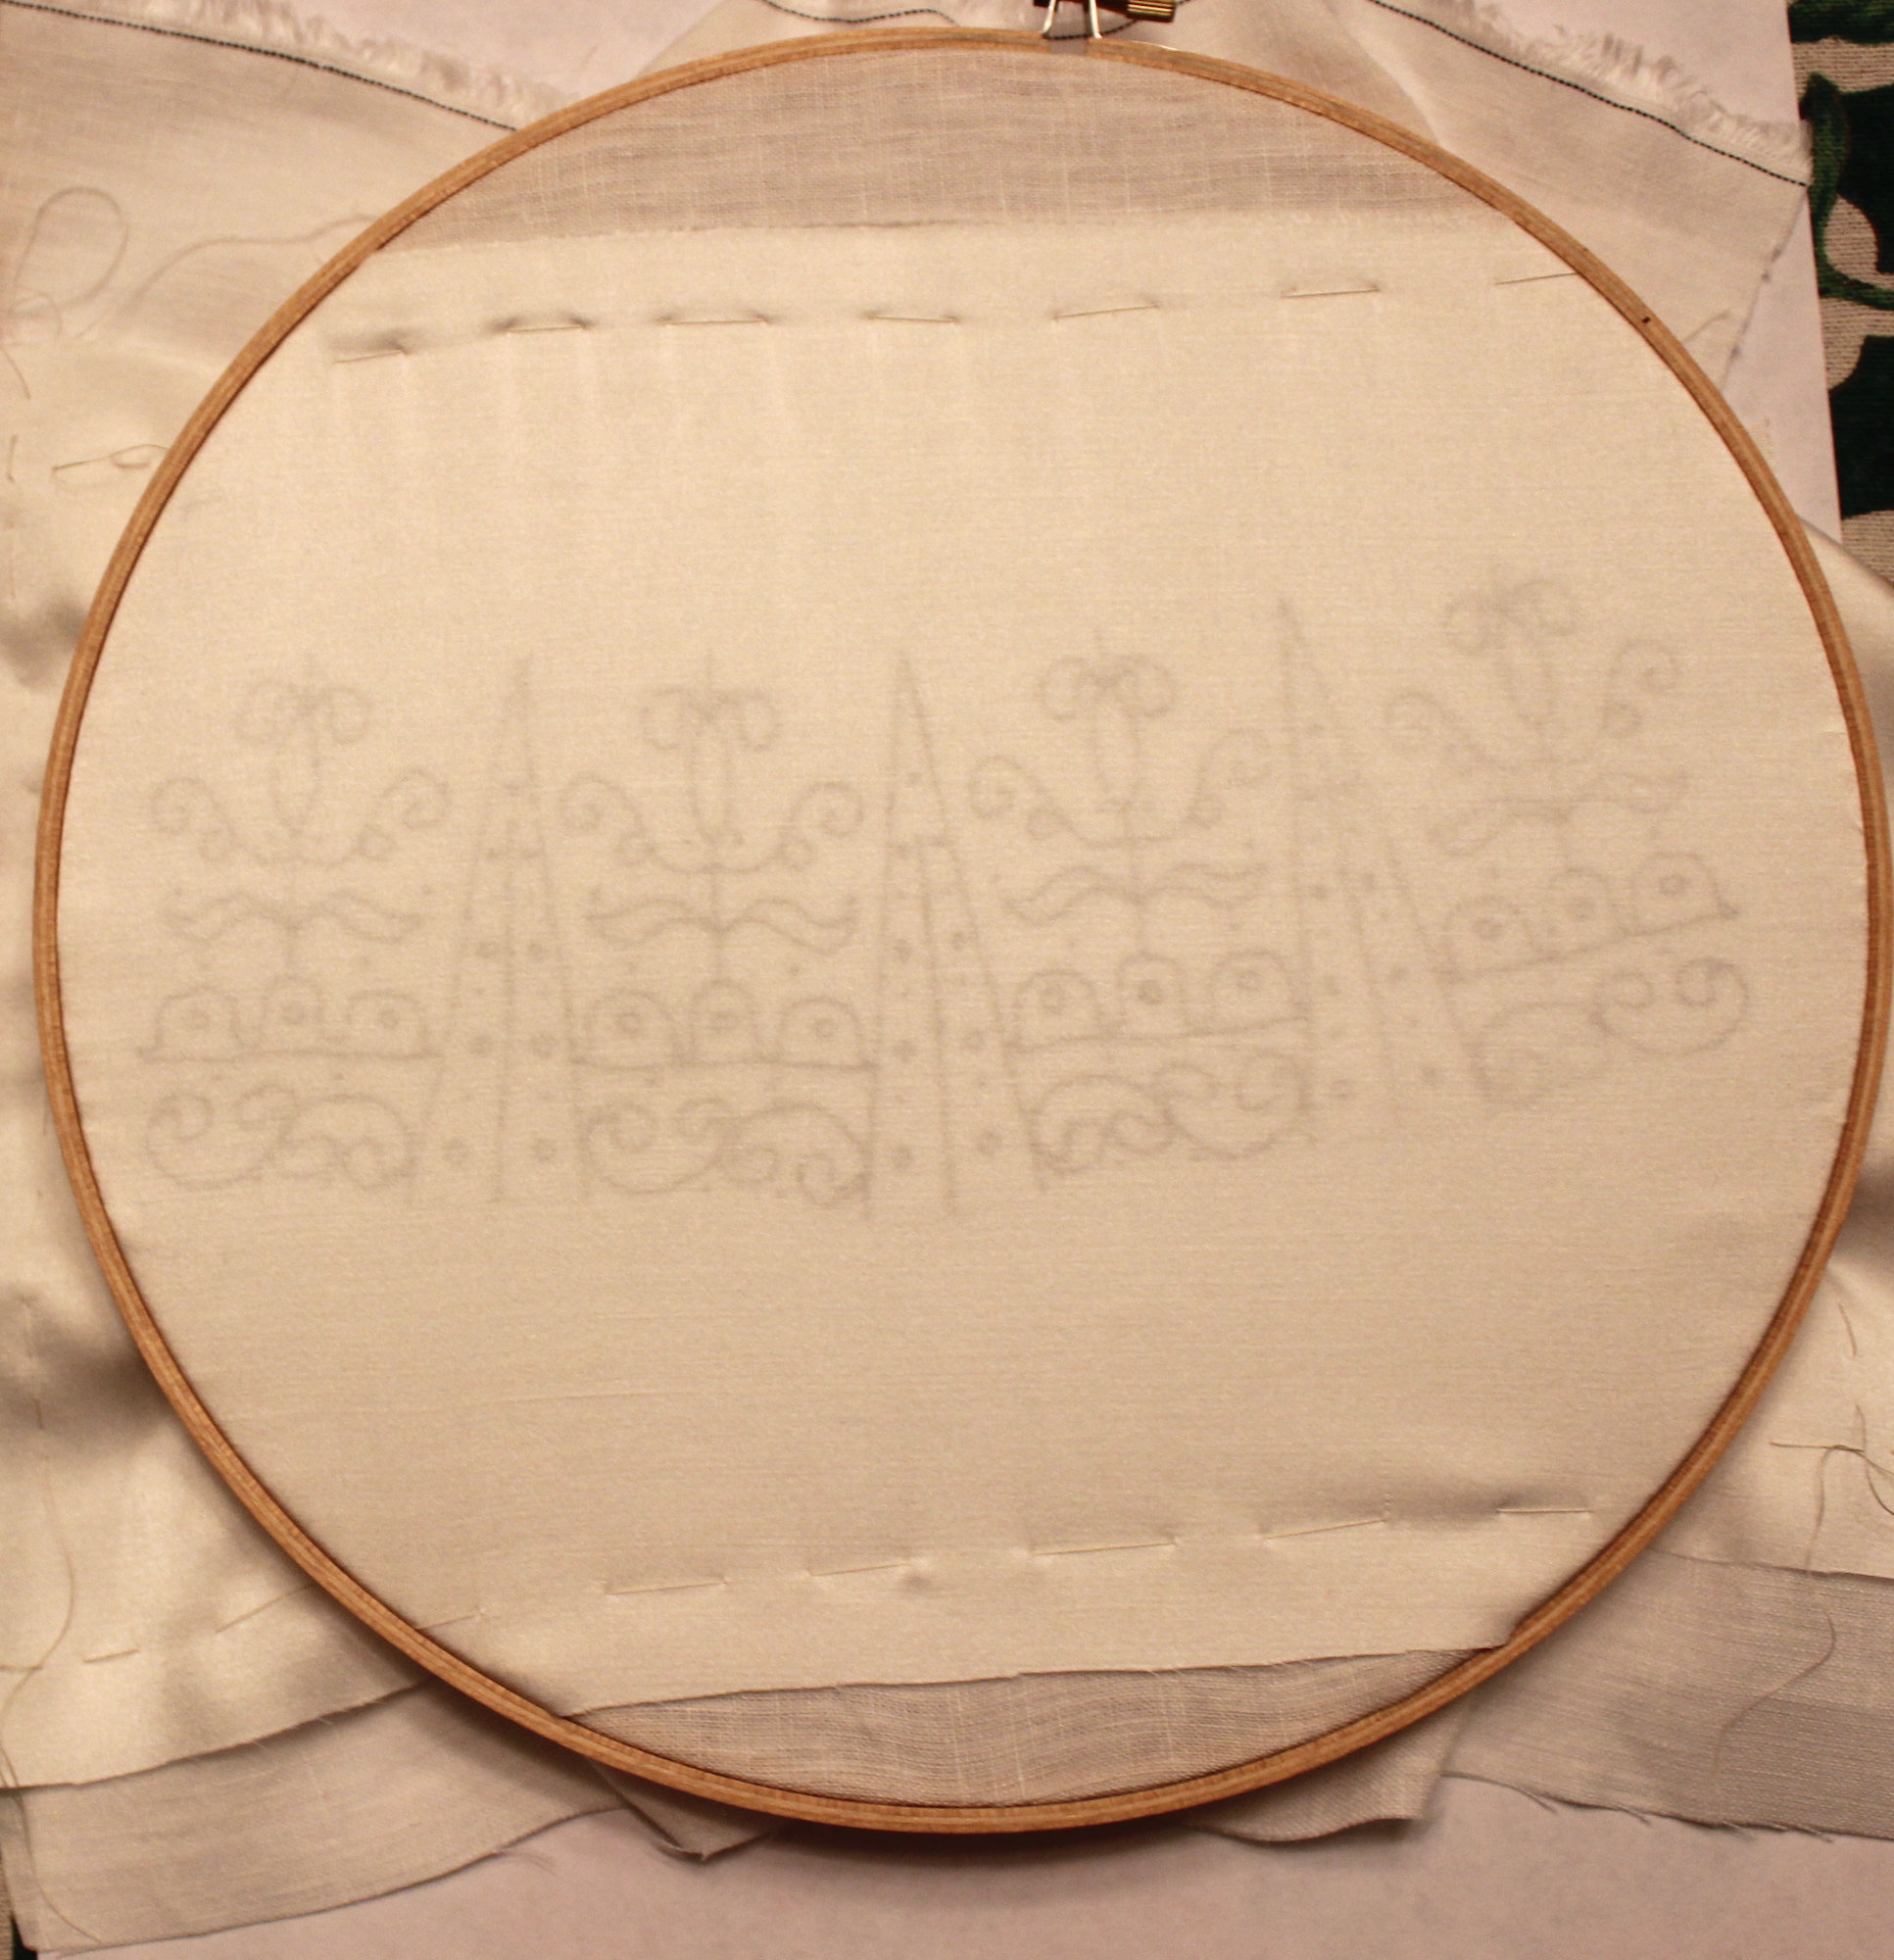
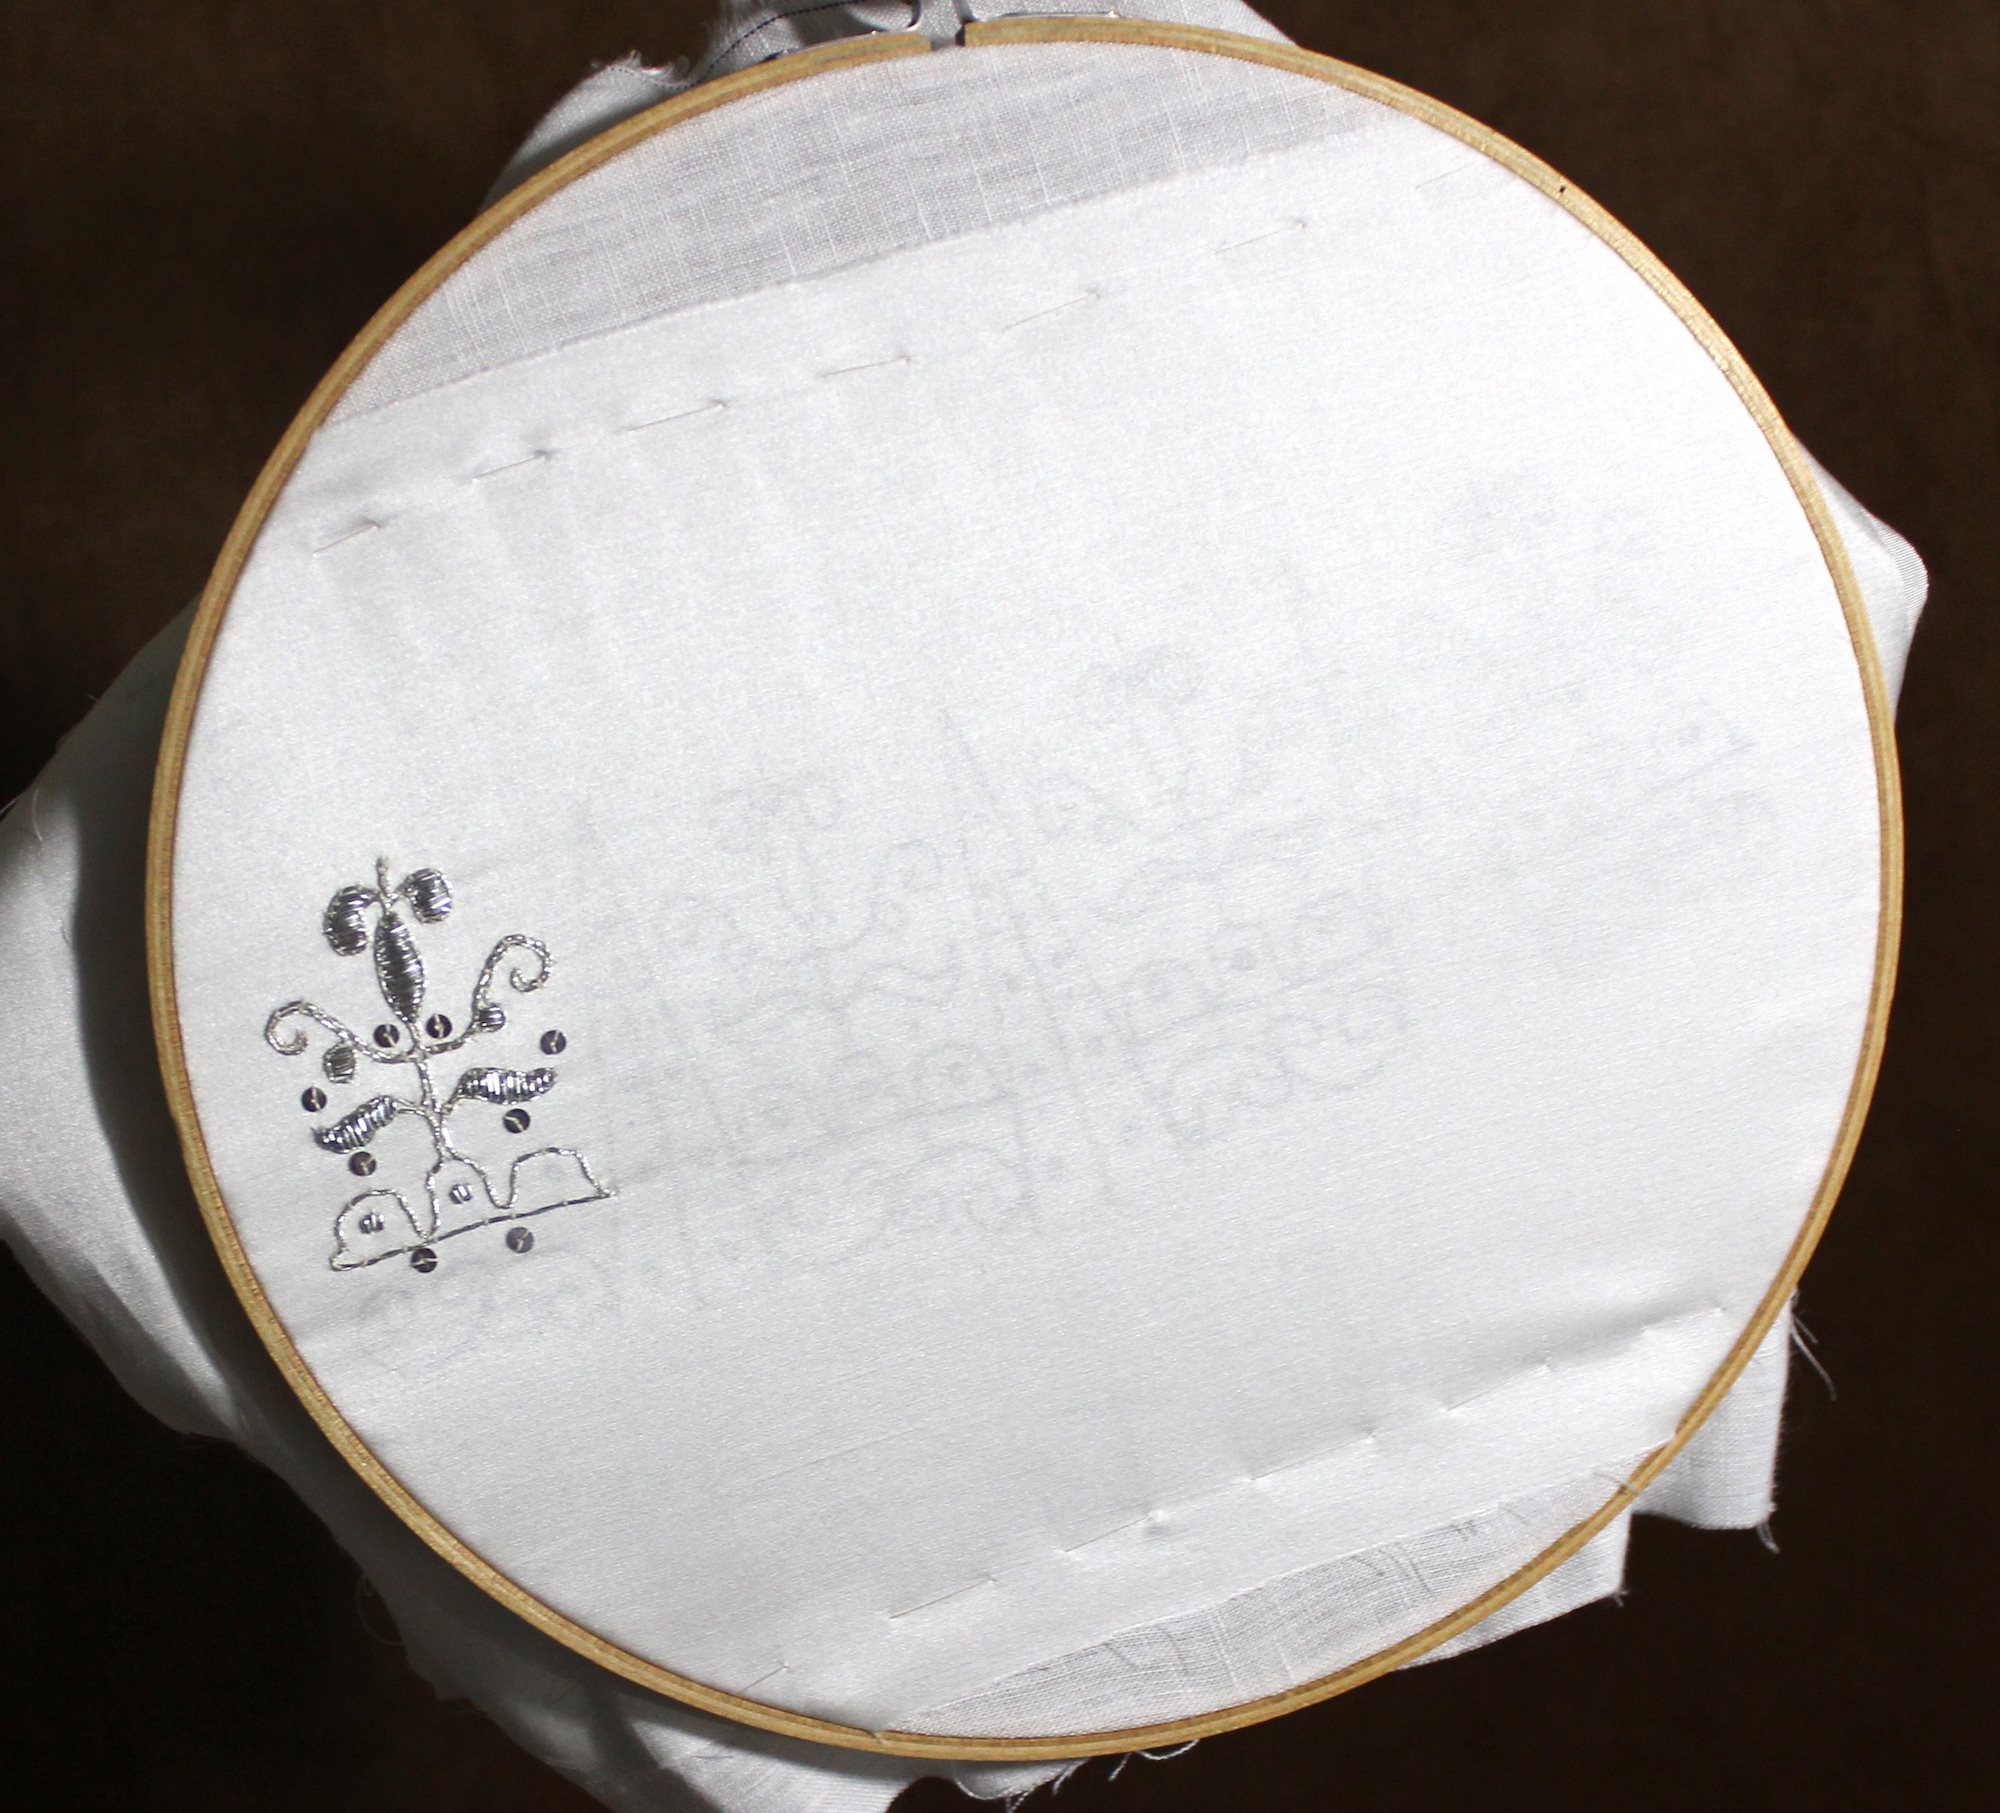
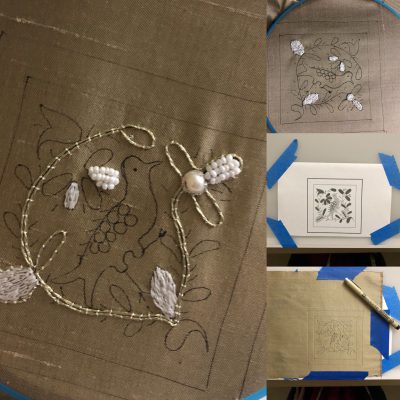
Early 17th Century Glove Cuffs WiP
The design traced onto a linen/cotton blend 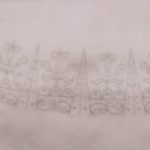
Silk satin laid over the linen 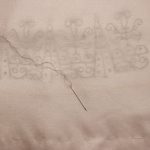
The layers are basted in place 
The design juuuuust fits in the hoop 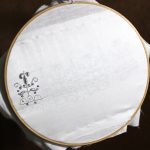
Start of the silver gold work and spangles