Centuries-Sewing

Author: Centuries Sewing

  • The use of buckram as kirtle stiffening and other thoughts

    The use of buckram as kirtle stiffening and other thoughts

    I’ve been busy with not sewing this past month and have directed my energy to a great deal of online research. First and foremost the use of buckram as a gown stiffening has always puzzled me. Was it wet molded to the figure? (Rather unlikely.) How did it hold up if someone got caught in the rain? Is what we think of as buckram the same thing that was used in gowns? My own experiments with what I could get locally it were less than successful, see my Green working class gown which used two thin layers of buckram fused together and the Unicorn painting inspired Gown which used just one layer.

    2 layers of lightweight buckram fused together
    Single layer of light weight buckram
    Pad-stitched bodice layer of twill, buckram and batting

    I’m slim, but the buckram still bent and bunched mainly under the breast and at the curve of the waist.

    When I started on my version of the “Pisa Gown”. (Currently on hold.) I tried to counter act this by padding out the bodice using layers of cotton quilt batting. I set a layer of batting on the inside of the bodice and a second smaller layer just under the bust to help fill in the space. Laurie Tavan did something similar with her Florentine Gown but wore hers over a pair of bodies.

    Yet even with the layers of padding and extra stitching the buckram started to buckle. So I set the project aside. I wasn’t sure if I was going at it wrong, or what I had on hand wasn’t stiff enough/the right material. But I sat on the idea for several months and got distracted turned my attention to Tudor gowns from the reign of Henry VIII.

    Kirtle bodice with no boning
    No boning, no buckram just a medium weight canvas

    I read “And her black satin gown must be new-bodied’: The Twenty-First-Century Body in Pursuit of the Holbein Look” -Jane Malcolm-Davies, Caroline Johnson and Ninya Mikhaila. Their findings of trying to reproduce the Holbein look on various body types made sense, and became a deciding factor when I made my green/brown kirtle.

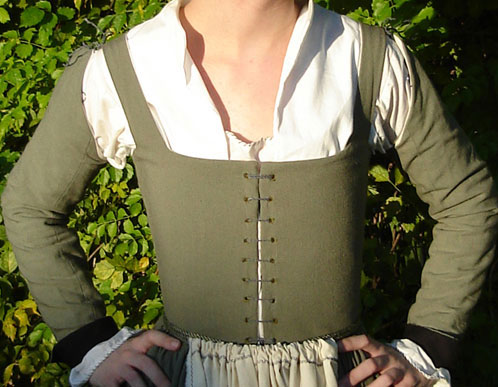
    I decided to use no boning in it the kirtle at all for a few reasons, one I was still hand sewing my pair of bodies and I really did not want to revisit a similar boning diagram, and two I wanted to see how far fit could take me.

    Using just a layer of canvas rather than buckram allowed for the fabric to form around me, it didn’t make sharp heavy creases under the bust or at the waist. The support you get is not from shifting and holding parts of the body up or in like a fully boned pair of bodies/corset would do. The support comes from being well laced and well fitted, and gives it a soft line. Yes, there are some wrinkles that a few bits of boning would take care of, but as a gown would generally cover the kirtle I am fine with them being there.

  • A Pair of Bodies: Finished

    A Pair of Bodies: Finished

    Pair of bodies from the side.

    Another project off my list. I worked on this off and on for several months. A majority of the construction was done over the course of a week. The actual finishing like the eyelets and binding and the busk took far longer then sewing the boning channels.

    Two layers of cotton duck with the outer layer of red cotton sateen (standing in for silk, ask my cat about it). Hand sewn with black silk thread. Self made bias tape, and hand sewn eyelets with matching cotton floss.
    The pattern is my usual bodice block. It is boned with cable ties, the boning diagram is rough nod to Pfaltzgrafin Dorothea Sabine von Neuberg’s corset.

    Pair of Bodies with busk

    Pair of bodies insides

    Pair of bodies from the side.

    Pair of bodies back eyelets.

    A Pair of Bodies (Corset)

  • Mockado Gown: Progress Pictures.

    Mockado Gown: Progress Pictures.

    The skirt and sleeves are attached, now it just needs the cuffs, trim, and hooks and eyes up the front.

    Grey mockado gown work in progress side shot.

    Grey mockado gown work in progress back shot.

  • Mockado Gown: Seam allowances and Ponderings

    Mockado Gown: Seam allowances and Ponderings

    It feels pretty strange picking up a project that has sat to one side for so long. It is all bits and pieces, the skirt had been on my dress form for at least a month, waiting for me to hem it. The lining and the outer fabric dropped and the lining somehow got bigger than the outer fabric so I ripped open the back seam of the skirt and laid it out on the floor.

    I basted the layers together and evened the lining out, then re-serged everything and sewed the skirt back up. The skirt then went back on the dressform to keep it out of trouble and cat hair.

    Then I turned my attention to the bodice, I made a mock up of it and fitted it over my brown/green wool kirtle (really I still haven’t decided what color it is and most likely never will.) From the drawing the gown over laps in the front but I have no idea how it is actually held together. Pins might be one option, hooks and eyes another or even hidden lacing and pins.

    These are the mysteries of the universe.

    So I cut my bodice out with extra room at the center front, and a bit extra at the shoulder straps.

    I realized over the course of fitting this over the kirtle, I need to tweak my bodice block when it comes to the shoulders. I have very sloping and forward shoulders and the fixes I’ve done in the past are not quite working. I’ll post more on that later with pictures to show what I mean.

    The bodice cut out, I then cut out the interlining, muslin and lining, which is my least favorite part of sewing due to the number of pieces that need to be cut out, pressed and then everything bundled together so I don’t lose anything. (Dear sleeve lining, please come home soon.)

    Basting the interlining in place
    Basting the interlining in place

    I basted the interlining to the muslin which I then basted to the fashion fabric. I could have just machined it but over the past year or so I’ve gotten to where I enjoy hand sewing.

    That doesn’t mean I’m not using the machine on this project. But I don’t really have a deadline on this outfit and it isn’t a 100% reproduction. I’m using it as a test and I should try to enjoy what I’m making rather than racing toward the finish line.

    On a technical level, as someone who likes to take things apart and put them back together. (I get that from my grandfather.) I like the idea that should this ever be taken to pieces by someone else they will see that some extra time was taken with it and they might learn a new trick. I might be over engineering things. (Which I am very guilty of.) But things should be interesting to look at inside and out.

    My sewing philosophy aside, I then spent a day or two catch stitching the seam allowances down with silk thread. It keeps them flat, helps hold down the fraying and makes me use stitches I don’t use every day.

    Catch stitching the seam allowances down
    Catch stitching the seam allowances down.
  • End of the year costume wrap up post – A wee bit late

    It has been a bit quite here, I haven’t had much time to sew. But that hasn’t stopped me from planning future projects and taking a look at what I got done for 2010.

    Finished for 2010

    Unicorn Inspired Florentine Gown
    Unicorn Inspired Florentine Gown
    Velveteen Fitted English Gown
    Velveteen Fitted English Gown
    Pink Working Class Kirtle
    Pink Working Class Kirtle
    Green Wool Kirtle
    Hand Sewn Green Wool Kirtle
    Tudor Wills and Inventories on Google Books
    Tudor Wills and Inventories on Google Books
    Elizabethan Wills and Inventories on Google Books
    Elizabethan Wills and Inventories on Google Books
    Elizabethan Fabric Series: Mockado
    Elizabethan Fabric Series: Mockado
    Examples of pleats and gathers
    Examples of pleats and gathers
  • 16th Century Mockado Gown: Some progress

    16th Century Mockado Gown: Some progress

    I’ve been sitting on this project for some time waffling back and forth on fabric use for Henry VIII’s era and if the fabric I have can be even called mockado. I mentally went back and forth until the project had stalled due to my indecision. But In the end I’ve decided I don’t have any other use for the fabric, and I need to test the dress pattern I want to use for a different project. So this is becoming something of a wearable mock-up with some research to keep my perfectionist side happy.

    I’ve long admired the sketch of “A Lady Walking” by Hans Holbein the Younger.
    The dress was plain but elegant and she sported a wild headdress that must have been a pain to wear on a windy day.

    Englishwoman by Hans Holbein the Younger
    Englishwoman by Hans Holbein the Younger

    My thoughts and speculations

    From the sketch alone: she wears a red half kirtle/underskirt/petticoat whatever you want to call it, it is most likely wool. Over that she wears a gray kirtle, most likely also wool, and over that a blue-gray wool gown trimmed with velvet.

    We can’t see if the gown has a waist seam or not, we can only see that the front overlaps, possibly closing with hooks and eyes or it is pinned shut. The gown in the skirt doesn’t look like it is lined and the hem appears not to be bound. The wool is most likely felted or finished to keep it from raveling, giving it that clean edge.

    The skirt is full enough that the gown might have a small train, or be floor length, hence the system of straps to keep the skirt hooked up out of the mud. If this is part of the mysterious white band is still up for debate, but a similar device is hinted at on Margaret Clement(?) in the sketch of Thomas More’s family. In the remade painting the figures are rearranged and this detail is a bit harder to see.

    She also has a green, perhaps silk tasselled sash, a rosery or paternosterer at her side, small buttons on the top of her velvet cuffs, and a partlet that buttons at her throat.

    The gray kirtle looks like it is the same type/weight wool as her over gown and looks to be unlined. On her feet she has the classic square-toed shoes for the era and what might be silk or fine linen stockings.

  • A Brown Wool Kirtle: Then End of the Story and Photos

    A Brown Wool Kirtle: Then End of the Story and Photos

    Brown/Green Wool Kirtle

    I finally finished the Brown Green wool kirtle. I had left off the last posts talking about sleeves and eyelets but once I got into the swing of things I got them done without taking any photos.

    Bad me.

    I was to the point of hemming the skirts, so I marked the hem and then carefully trimmed it even and overlocked the edge to keep it from fraying.

    Then I put the kirtle on… and I hated it.

    The bodice point came down far too long and didn’t curve in enough along the waist before hand. I looked for lack of better words, stumpy. I was not happy, I was so not happy I set the whole project aside for a month. I knew how to fix it, but taking apart an almost finished project goes against my grain. What if I messed it up?

    After it sat for a month in time out, I got annoyed one night and decided that was it. I was going to fix it and if I messed up well then I’d have a brown/green petticoat. So I unpicked the front of the skirt and trimmed down the bodice point by two inches.
    That fixed it, even if it turned my nerves into noodles.

    Then it was just binding the hem and it was done.

    Green/Brown wool Kirtle

    Green_brown_woolkirtle_Back

    Green_brown_woolkirtle_side

  • I am waiting with bated breath

    Patternmaking in Fashion
    Patternmaking in Fashion

    A few days ago I was catching up on the posts over at Fashion-incubator and saw that the site owner, Kathleen Fasanella had given a nice review of the book “Patternmaking in Fashion step by step”.

    (And because of the title I have had the New Kids on the Block song stuck in my head. I was never a fan of them growing up, but still the horrible music stays with me.)

    Amazon has it for only about 10 dollars so I placed an order and for most of today been stalking the ups tracking number. The book does not deal with historical clothing in any way shape or form but I am trying to expand my drafting knowledge.

    I already have Jack Handford’s “Professional Patternmaking for Designers: Women’s Wear and Men’s Casual Wear“. Which I’ve read through several times and find most of it well explained. The line drawings at times and the text are not always enough. I had some confusion with the bust apex measurement and how they related to one of the drafts, but after reading it over a few more times it started to make sense.

    Unfortunately, Handford’s book on grading seems no longer easily affordable or available and I have yet to come across any affordable alternatives. If anyone has any book suggestions for pattern grading please let me know in the comments. =)

    For now I’ll go back to refreshing the ups tracking number every 2 minutes.