


About three or four years ago I was gifted 6 yards of grey uncut corduroy for Christmas. I had intended to use it for a Spanish gown but the fabric lurked on my shelf untouched. After the Tudor Tailor came out I started to eye the yardage with a bit more interest When I finally took it down off the shelf it had a bit of damage to it, along the center where it was folded there was a line.
That scrapped my plans on the Spanish Gown, and the fabric sat on my shelf as the fold line haunted me. It wasn’t that noticeable but I knew it was there. Then I came across Holbein’s drawing again and some navy blue wool had come into my possession. I thought aha! I shall make the drawing in the blue wool! But the blue wool was rather nice, and I needed to test my latest pattern block and make a mock-up to make sure the neckline was high enough, oh and there was that overlapping part in the front. One thing led to another and the grey fabric got taken down again, to become a test dress for the blue wool.
This led to a great deal of research on the use of mockado, or mock velvet in period, gable hoods, funeral brasses and many late nights looking at inventory records.
I did not expect to like this dress, but in the end it came together and it feels “right” when it is on. There are a few things I might do differently, set the gores a touch higher, gives the cuffs some interlining so they have a bit more body.
The gabled hood is version 3, made from thin buckram fused together, edged with wire and then mulled with thin quilt batting before being covered with linen. The back box, veils, and lappets are also linen. I have no idea if linen was actually used for these parts. I had some silk in mind for them but the linen was a true black, where the silk was more of a pale charcoal. Eventually I will make a new box and veil and lappet from velvet or a darker silk.


After a year of putting the skirt together I have returned to making the “Pisa” Gown. This was not a planned execution back into the fray and fluff of velvet, but rather a unhinged returned after being driven half mad by Tudor skirts and lots of ironing. But more on that later.
After my experiments with buckram and pad stitching I decided the first bodice I started on was a learning experience. I had yet to cut the final velvet layer so I didn’t feel too bad starting over. I used my tweaked block pattern and then got cold feet for a few days over the style of the bodice point.
Eleanora’s grave gown and the Pisa gown are both cut with a very steep dropped waist. I’m a bit smaller then Eleanora, based on the clothing measurements in the back of Pattern’s of fashion, and that steep of a point does not look good on me, so after some debate I cut the waist with a bit more curve at the waist to the point, rather then a straight line.

The bodice taken care of I had to decide how I was going to stiffen it. I’ve found that gown interlinings need to either be stiff enough to shape the body or soft enough to mold with the body, if it is between those two extremes you get creases and wrinkles.
Usually just a layer of twill or canvas works well for me, but Moda mentioned the use of felt interlinings which I’ve wanted to try since reading about it.
I did not have any felt on hand nor could I run out to the store at 3am, but I did have some cotton needle punched quilt batting and decided that was close enough.

What I used:
Washed cotton twill: 1 yard
Warm and natural cotton batting: 1/2 a yard
muslin (cut the pattern with straps and seam allowances): 1 yard
I cut two layers of cotton twill, and a layer of the batting with seam allowances but without straps. Those were stacked in a twill, batting, twill sandwich, pinned and then the whole thing zig-zag stitched together.

I did the same thing for the back stopping each row before I got to the seam allowances, pivoting the interlining and then starting a new row. In the end the whole thing had almost a corded appearance. (Which might just be from some tension issues with the machine.)
With both pieces done I basted them by hand to a layer of muslin, sewing just the outer layer of twill to it. (The twill layer laying against the muslin).


I then cut away the seam allowances and in a little bit more, of the batting and the twill layer facing me. This reduces the bulk and means I will not be sewing eyelets through batting. The muslin is then basted to the velvet fabric all around save for the waist line which is left open.

I hate making Tudor/Elizabethan smocks and shirts. They are boring, all the rectangles and squares don’t provide much of a technical challenge, save for a bit of fussing when setting in a gusset if you do it by machine.
Patterns of Fashion 4 has shown me the charm of a well made smock when bedecked with lace, embroidery and silk buttonhole twist. Enough that I have plans of making at least one by hand. That will take several weeks, and in the mean time I have other projects I want to work on and the one low cut smock I have (Yes only one.) has started to tear.
It is made out of plain cotton muslin rather then linen, but the fabric is still serviceable and I don’t mind wearing it.

The tear happened right where there shoulder and chest area meet at a corner, when I made this I simply turned under the seam allowances and hemmed them down. I did sew over the corner area where the seam allowance was mitered to reinforcing things but that didn’t last.
So we are going to repair this tear and the small one that has started at the other corner, and then we are going to make sure it cannot tear again.
Note: I have not found any extant examples of this exact technique being used in the 16th century. Patterns of Fashion 4 mentions contemporary patches being but at the corner of one smock after embroidery was carried out. Other shirts have thread reinforcements at the end of seams. I wanted something smaller then a patch, due to the thin nature of the cotton and this is what I came up with.
First I fold the smock down, right sides together so the torn edges are flat against one another. Then I whip stitch over the edges, going just far enough in past the torn edges that the stitches do not pull out.
Do this as many times as needed until you have sewn up the tear, it will look almost like you have made a very small dart.


The tear is no more, but that is still a weak area of the neckline.
So cut two lengths of selvage (the woven edge of the cloth that does not fray), you just need them to be a few inches.
Fold the cut edges of the selvage down with your fingers and then fold the selvage in half. With the folded cut edge facing the inside of the smock, pin the middle of the selvage to the corner of the neckline where the tear was.
Now whip stitch along the outside edge of the smock, catching the folded selvage edge and the neckline together with small stitches.
I’m sewing at about 30 stitches an inch which is finer then usual for me.


Go along the edge of the smock till you reach the end of the selvage, turn the end under and stitch it down against the neckline hem.
Keep going along the inner edge until you get to the corner where the tear was, clip the selvage a tiny bit and then sew over the notch. You do not want to clip it to the neckline, that negates reinforcing the edge.
A small clip will ease the tension along the selvage without having to make a dart in it.


Finish sewing along the inner edge of the smock, tie off and clip your thread and you are done.

This is my follow up post to the question of using buckram in kirtles.
To back track a bit, in March I hit Google books and British History Online to hunt for how buckram was used in early 16th century England.
Since my use of it in kirtles for support was iffy at best, I turned to inventories and expense accounts to see if I could find some concrete information.
What I found was buckram being used as a stiffening agent in gowns rather then kirtles. This makes a great deal of sense. If we assume the buckram used then was similar to the buckram used now, (a firm fabric sometimes but not always stiffened with glue) to have it in a kirtle, is to have it near sweat and body heat which can wilt it like a wet paper towel.
I found it was used to line the bodice of gowns but that is not the only thing, below I’ve listed a few excerpts.
“..2 yds. of buckram to line the upper sleeves,..”
“A brown-blue gown, lined with buckram, and purfelyd with black velvet.”
“A woman’s black round gown, lined with bokeram, and wide sleeves lined with black velvet.”
“Necessaries for my Lady.—For Philippe, the maid, marriage money, 6l. 13s. 4d. A quarter and a nail of tawney velvet for my Lady’s purse, 3s. 9d. A skein of silk for ditto, 2d. An ounce of tawney silk for string, 14d. A quarter of buckram for lining, 2d. 5 yds. buckram for Philippa’s gown, 2s. 11d. A quarter and a half of velvet, 4s. 3d. ½ yd. linen cloth, 2½d.; anglets,” It seems here buckram to line the purse and enough buckram to line all of the gown
“…and making a gown, a kirtle, and a petticoat for Phillippa against she was married, 3s. 6d. A quarter velvet more for the maid’s gown, 3s. 3½ yds. buckram, 2s. 1d. “For lining and agnetts to the playtes,” 10d.” I haven’t figured out what agnetts is yet, but perhaps buckram to pad out the pleats?
“I have delivered to Mr. Skutt 1¾ yds. Lywkes velvet for the upper bodies and placards, and 2½ yds. of the best black satin for lining the sleeves. He thanks you for the two dozen quails. I have further delivered him 15 yds. Lywkes velvet and a roll of buckram for your gown, and 6 yds. Lywkes velvet for your kirtle, &c. I will bring them with me to Dover.”
“For making 2 gowns, 1 cr. 2 yds. of black buckram, to line the two gowns in the bodies. 3 yds. of frieze, to line the pleats of the gowns after their use.”Frieze to pad the pleats this time.
So it is used to line sleeves, the bodice parts of gowns, it might be used to pad out pleats should I ever figure out what agnetts is. But no where is it mentioned being used in kirtles.
I’ve compiled a much longer list with citations and full excepts to give a bit more context to the entries. As I have time I hope to add more to it and look into what other things buckram was used for.

I’ve been busy with not sewing this past month and have directed my energy to a great deal of online research. First and foremost the use of buckram as a gown stiffening has always puzzled me. Was it wet molded to the figure? (Rather unlikely.) How did it hold up if someone got caught in the rain? Is what we think of as buckram the same thing that was used in gowns? My own experiments with what I could get locally it were less than successful, see my Green working class gown which used two thin layers of buckram fused together and the Unicorn painting inspired Gown which used just one layer.


I’m slim, but the buckram still bent and bunched mainly under the breast and at the curve of the waist.
When I started on my version of the “Pisa Gown”. (Currently on hold.) I tried to counter act this by padding out the bodice using layers of cotton quilt batting. I set a layer of batting on the inside of the bodice and a second smaller layer just under the bust to help fill in the space. Laurie Tavan did something similar with her Florentine Gown but wore hers over a pair of bodies.
Yet even with the layers of padding and extra stitching the buckram started to buckle. So I set the project aside. I wasn’t sure if I was going at it wrong, or what I had on hand wasn’t stiff enough/the right material. But I sat on the idea for several months and got distracted turned my attention to Tudor gowns from the reign of Henry VIII.

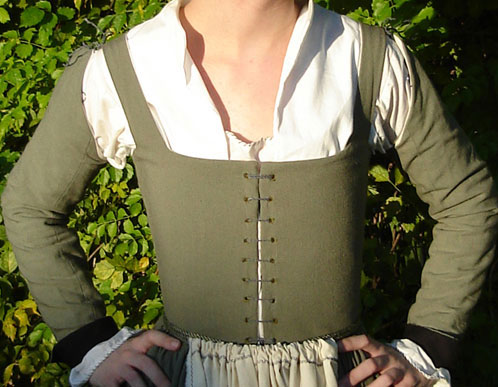
I read “And her black satin gown must be new-bodied’: The Twenty-First-Century Body in Pursuit of the Holbein Look” -Jane Malcolm-Davies, Caroline Johnson and Ninya Mikhaila. Their findings of trying to reproduce the Holbein look on various body types made sense, and became a deciding factor when I made my green/brown kirtle.
I decided to use no boning in it the kirtle at all for a few reasons, one I was still hand sewing my pair of bodies and I really did not want to revisit a similar boning diagram, and two I wanted to see how far fit could take me.
Using just a layer of canvas rather than buckram allowed for the fabric to form around me, it didn’t make sharp heavy creases under the bust or at the waist. The support you get is not from shifting and holding parts of the body up or in like a fully boned pair of bodies/corset would do. The support comes from being well laced and well fitted, and gives it a soft line. Yes, there are some wrinkles that a few bits of boning would take care of, but as a gown would generally cover the kirtle I am fine with them being there.


Another project off my list. I worked on this off and on for several months. A majority of the construction was done over the course of a week. The actual finishing like the eyelets and binding and the busk took far longer then sewing the boning channels.
Two layers of cotton duck with the outer layer of red cotton sateen (standing in for silk, ask my cat about it). Hand sewn with black silk thread. Self made bias tape, and hand sewn eyelets with matching cotton floss.
The pattern is my usual bodice block. It is boned with cable ties, the boning diagram is rough nod to Pfaltzgrafin Dorothea Sabine von Neuberg’s corset.


")

